When the integration of Apple's iMessage feature and Messages app facilitates the convenience in syncing and accessing messages across Mac, iPhone, iPad, and even Apple Watch, people tend to keep more conversations initiated on different Apple devices that have been logged in with the same Apple accounts. However, when there are tons of useless messages accumulated, you may find it hard to sort out important messages, and they also take much place. Therefore, when it comes to the question on how to delete messages on Mac efficiently, this blog is written to help. Now, read on and see how to do it.
You May Also Like:
How to Delete Mail on Mac (Mails, Attachments, the App)
3 Tricks to Delete Useless iTunes Files on Mac
Content
Part 1. 3 Ways to Delete Messages on Mac
To delete messages on Mac, there actually are a few ways to utilize, based on how many messages you need to remove at a time. This part will list 3 different methods as your reference.
How to Delete Individual Messages on Mac
This is the simplest way to delete message on Mac. You can keep the conversation private without leaving important information by deleting a single message included in a conversation with others. This is the way:
Step 1. Launch the Messages app on your Mac, subsequently, open the conversation you need to delete messages from.
Step 2. Please scroll to find message you need to delete, then right-click on it.
Step 3. Simple click on Delete to confirm the deletion, and the message will be removed from the conversion on your side (it still exists on the receiver's device).
How to Delete Multiple Messages on Mac
Sometimes you have need to remove the trace of several conversions for hiding sensitive or confidential information. In terms of this circumstance, knowing how to operate for deleting multiple conversions on Mac can save your time. You only need several easy steps to complete the task:
Step 1. In the Messages app, please also open the conversation you want to delete from your Mac.
Step 2. Now, go to File ➙ Delete Conversation… from the top menu bar on your Mac.
Step 3. Subsequently, simple confirm the deletion by clicking on the Delete button.
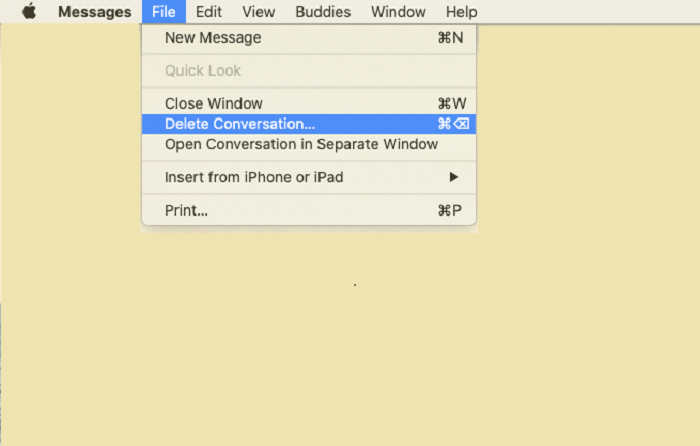
To delete all messages in a conversion, there are two more alternative ways to do:
Right click on the conversion on its left side, a Delete Conversation option will appear there.
After highlighting the conversion you need to delete, you only need to press ⌘ + Delete on keyboard at the same time, then the conversion will be deleted after you confirm the Delete option.
How to Delete All Messages on Mac Permanently
Under the circumstances when you need to delete all messages on Mac permanently for leaving no trace on any them, like when you want to sell your Mac as a second-hand good, this is the best way to delete all of them, including iMessages forever for you:
Step 1. Running Messages app and sign out your Apple ID will be the first step. Please go to Preferences ➙ iMessage and then submit Sign Out.
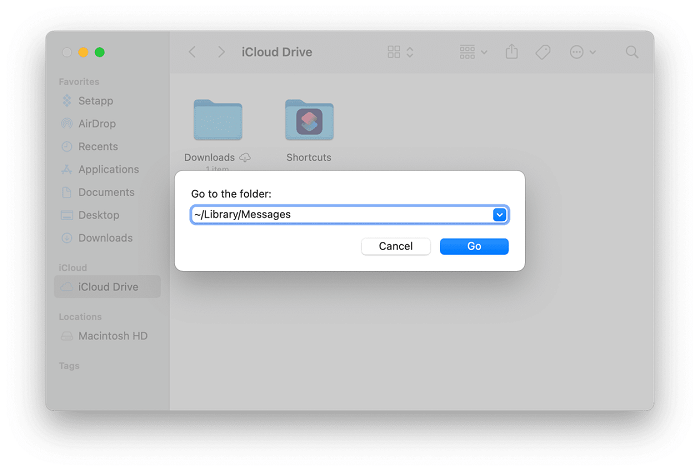
Step 2. Now, shut down the Messages app and choose Go ➙ Go to Folder (⌘ + Shift + G) on the menu bar.
Step 3. Manually type in ~/Library/Messages (you can also paste the order to the blank), then submit Go.
Step 4. Start the deletion now! You need to delete Archive and Attachments folders, and don't forget the chat.db, chat.db-shm, and chat.db-wal files as well.
Step 5. Complete the whole permanent messages deletion by restarting your Mac.
Part 2. How to Delete Messages from Other Messaging Apps
Instead of the built-in Messages app in Mac, the advent of a variety of chatting apps launched for convenient message communication online, such as apps like Messenger, WhatsApp, and so forth. These messaging apps also take much space on Mac.
Although the official way to delete messages from these apps are different, there still has the most efficient way to delete and manage messages from these messaging apps within clicks easily. The only tool you require is Macube Cleaner, the best application to delete messages, unneeded files, extensions, data on Mac.

Key Features of Macube Cleaner
The 7 professional clean-up functions are provided by Macube Cleaner:
Smart scan –look up for the caches stored on Mac remove them
Large & old files – detect the files in large sizes or those are not used frequently for deletion
Duplicate finder – sort out the duplicated content on Mac for clearing them
Uninstaller – thoroughly delete the apps and their caches from Mac permenantly
Privacy – safeguard the user data and browsing history on Mac
Extension – properly manage and remove the add-ons on Mac to facilitate better Mac performance
Shredder – shred all unnecessary files on Mac to prevent them from recovering
In this part, let's see how to delete messages from all messaging apps on Mac with the assistance of Macube Cleaner within several easy steps.
Step 1. Install and Launch Macube Cleaner
First, please go to the product page of Macube Cleaner. Macube Cleaner is available for free installation before the purchase. So users are recommended to experience the free trial before the subscription. Please click on the download button here to download, install, and launch Macube Cleaner.
Step 2. Scan Messages of Messaging Apps
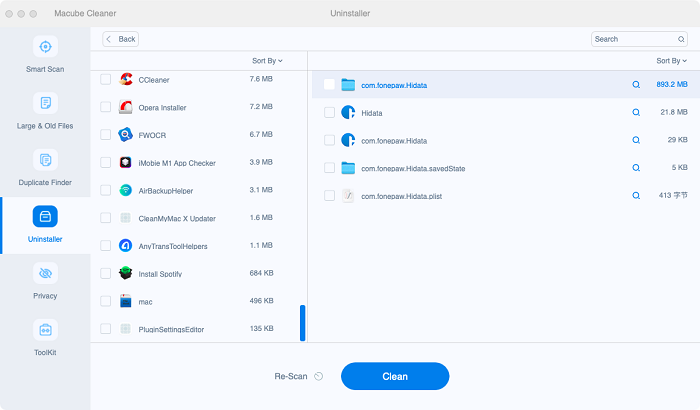
Atfer landing in the main feed of Macube Cleaner, please navigate to Uninstaller and submit to smart scan all apps installed on Mac. When this process is done, you can go into the messaging apps such as WhatsApp and Messenger to check the messages or attachments you wish to delete from your Mac.
Step 3. Ask Macube Cleaner to Function the Deletion
When you have ticked the messages, cache, and attachments you wish to delete, directly click on the Clean button, and all these messages can be deleted from your Mac within seconds.
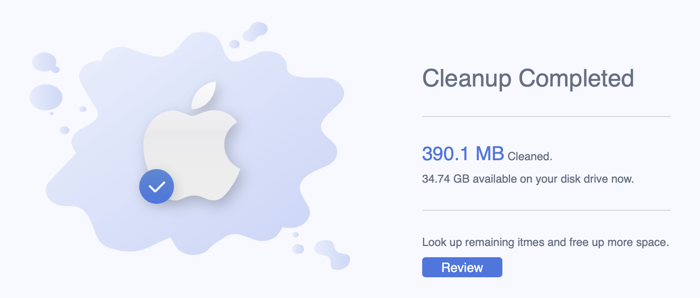
The operation is pretty easy to follow, and Macube Cleaner will help you delete the selected messages from Mac with quick speed. After that, you will retrive a clean Mac without messy messages accumulated.
Part 3. 5 Useful Tips About Deleting Messages
Lastly, here are some useful tips for you about deleting messages. By mastering several tips and tricks in managing messages on Mac, you will be able to get rid of the frequent message deletion works regularly. For instance, setting up the message auto-deletion option, remove auto synchronic service of iCloud, and so forth. Learn about them in this final part!
Set up Auto-Delete on Mac
MacOS delivers the option for users to keep messages in a selected period, including 30 days, a year, and forever. Let's see how to set the Auto-delete on Mac now.
Step 1. Launch the Messages app on your Mac device.
Step 2. Go to Messages ➙ Preferences ➙ General.
Step 3. After clicking on the Keep messages pop-up menu, please select how long you want to keep messages.
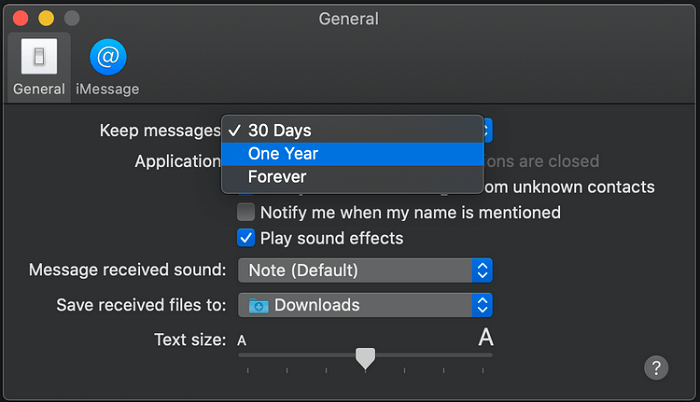
If you select a 30 days option, for example, all your message conversions and attachments will be deleted after the 30 days over. Generally, the Forever option is set by default, and that's why our messages will be kept on Mac unless we delete them manually.
Disable iMessage Synchronization Across Apple Devices
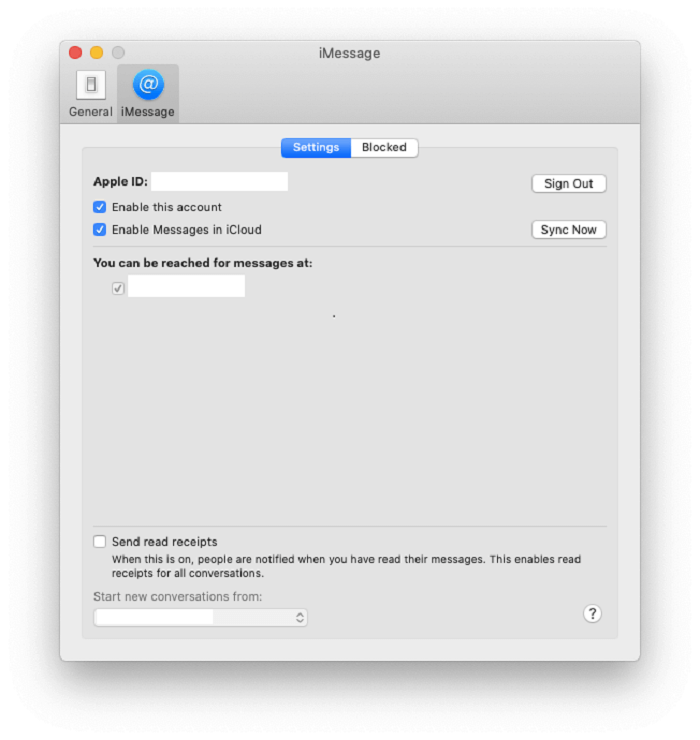
For iMessages, if you have enabled the synchronization across different Apple devices, when you delete those on Mac, that means you delete on all! By controlling a single message deletion on Mac but keep them on other Apple devices, you just need to disable the messages synchronization set in iCloud. Here is how you can do it:
Step 1. Open Messages ➙ Preferences ➙ iMessage.
Step 2. In Settings tab, simply disable both Enable this account and Enable Messages in iCloud.
Step 3. When both options are disabled, the message synchronization will be removed, and when you delete the messages on Mac, those saved on other Apple devices could be kept.
Quick Way to Delete Part of A Conversation on Mac
When people consider to delete only part of a conversion on Mac, this quick action can be completed within only very simple clicks instead of deleteing single message one-by-one:
Step 1. Open a conversation in Messages, and please scroll to the specific text bubble that you wish to delete.
Step 2. Tab to select the entire message bubble instead of the text of it.
Step 3. By pressing ⌘ + Click, you can add additional text selections directly.
Step 4. After the selection, please Control-Click or Right-Click, subsequently, please select Delete.
Step 5. Eventually, confirm to delete the messages and by tapping Delete, and those message selections will be deleted from the Messages app on your Mac.
How to Detele Attachments from Messages Only
Generally, the messages attachments occupy much space than text only. Therefore, when users need to delete attachments from messages only, this operation can be followed:
Step 1. Please navigate to About This Mac by clicking the Apple menu.
Step 2. Go to Storage ➙ Manage ➙ Messages.
Step 3. In the pop-up window, all the received attachments on your Mac will be listed here. Simply select the first one and hold Shift to select a column of the attachments that you need to deleted. To remove all of them, press ⌘ + A to select them all.
Step 4. Finally, please submit Delete to delete the selected attachments from your Mac.
How to Close Conversations Instead of Deleting Them
Please note that closing a message conversation is different from deleting it. After you click the X option for closing the conversion, the messages are still kept but you just collapse it. Next time when there has a message arrived in the conversation, the window will pop up again and the message history will appear again.
Just close any conversation in Messages by following:
Step 1. Go to Preferences and disable Save history when conversations are closed.
Step 2. Subsequently, hover over the conversation in Messages app, and on the left side, click on the X symbol just below the date, and you can close the conversation but keeping the message history.
If you're a Mac user and you wish to delete messages from Mac easily, these methods are all workable to help you free up more space on Mac. However, you need to always be careful before the message deletion because no recover method is provided now. So, give it some serious thought before you decide to deletion the messages for preventing the situation of removing any important messages from your Mac.


