Автозаполнение — это полезная функция браузера, которая помогает пользователям экономить время, автоматически заполняя ранее введенную информацию, такую как имя пользователя, пароль, адрес и платежные реквизиты. Несмотря на свое удобство, автозаполнение может представлять угрозу конфиденциальности и безопасности, особенно при использовании на общих или общедоступных устройствах. В этом руководстве представлены подробные инструкции о том, как удалить и отключить данные автозаполнения в различных браузерах на вашем Mac, чтобы повысить вашу конфиденциальность и безопасность.
Часть 1. Что такое автозаполнение?
Автозаполнение — это функция веб-браузеров, которая автоматически заполняет поля формы ранее введенной информацией, такой как имена пользователей, пароли, адреса и платежные реквизиты. Это экономит время, устраняя необходимость многократного ввода одной и той же информации вручную. Однако, хотя автозаполнение и удобно, оно также потенциально может раскрыть конфиденциальные данные, если не обеспечить безопасное управление ими, особенно на общих или общедоступных устройствах.
Часть 2. Удаление автозаполнения Google на Mac
После того как Google Chrome предложит пользователям сохранить учетные данные (имя пользователя и пароль) при создании учетной записи, автозаполнение может автоматически заполнять поля входа во время последующих посещений веб-сайтов. Однако из соображений конфиденциальности и безопасности важно знать, как управлять данными автозаполнения Google и удалять их на Mac. В этой части будут представлены 2 метода эффективного удаления информации автозаполнения.
Способ 1: вручную удалить автозаполнение Google на Mac
Шаг 1. Откройте Гугл Хром.
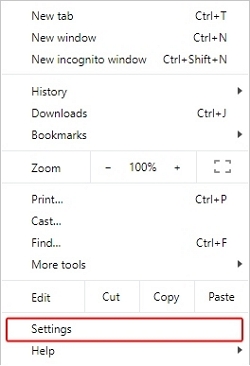
Шаг 2. Нажмите на значок меню из трех точек в правом верхнем углу и выберите «Настройки».
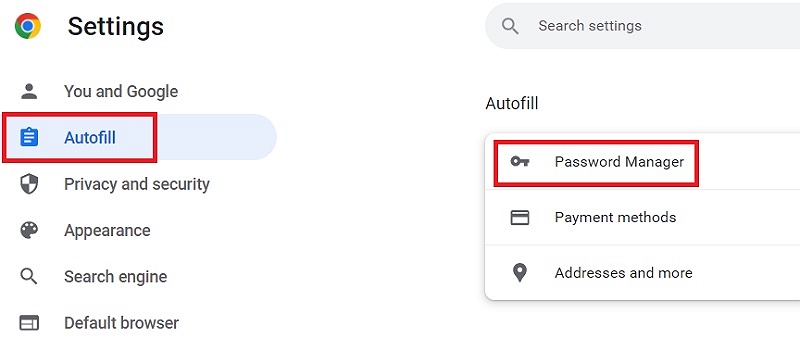
Шаг 3. Перейдите к настройкам автозаполнения: выберите «Автозаполнение» на боковой панели.
Шаг 4. Управление и удаление данных:
- Для паролей нажмите «Пароли» и удалите ненужные записи.
- Для способов оплаты нажмите «Способы оплаты» и удалите ненужные карты.
- Для адресов нажмите «Адреса и прочее» и удалите устаревшую информацию.
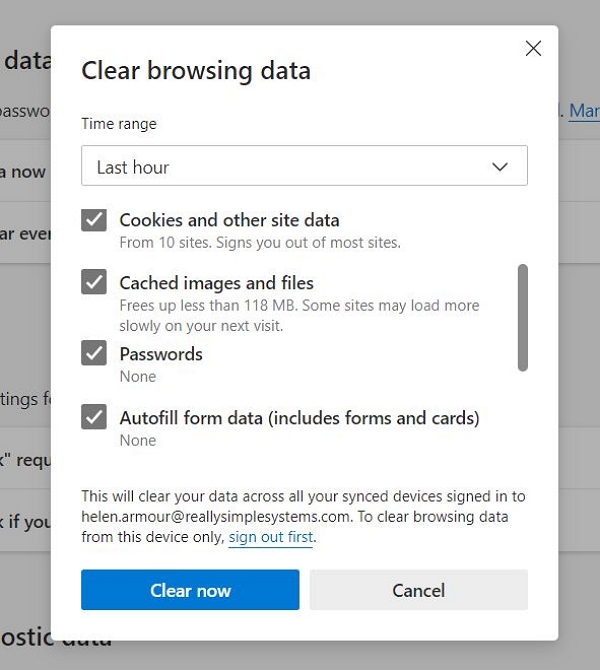
Чтобы полностью очистить всю информацию автозаполнения в Google Chrome, выполните следующие действия:
Шаг 1. Откройте Chrome и нажмите «Настройки».
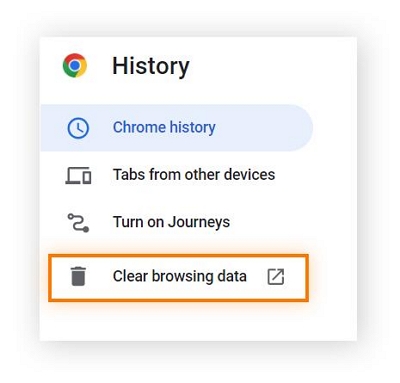
Шаг 2. Перейдите в «История» > «Показать полную историю». > «Очистить данные просмотра...»
Шаг 3. В появившемся окне перейдите на вкладку «Дополнительно».
Шаг 4. Установите флажки напротив «Пароли и другие данные для входа» и «Данные формы автозаполнения».
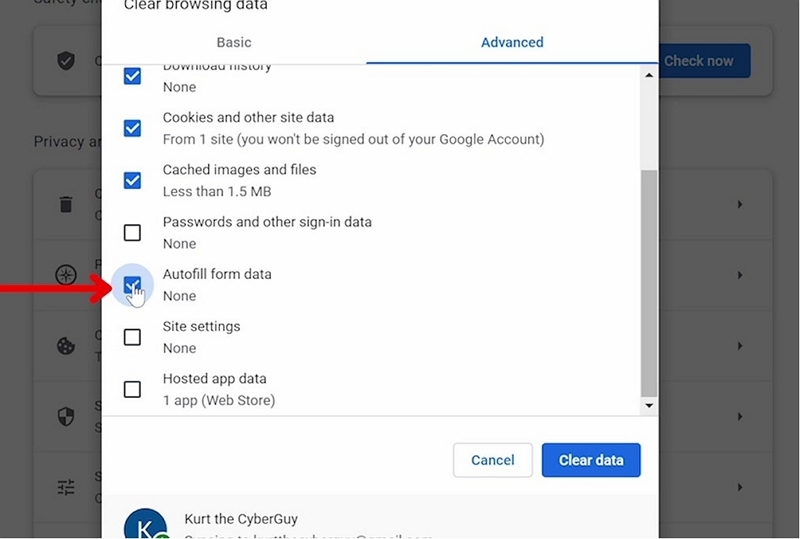
Шаг 5. Нажмите «Очистить данные», чтобы завершить удаление информации автозаполнения.
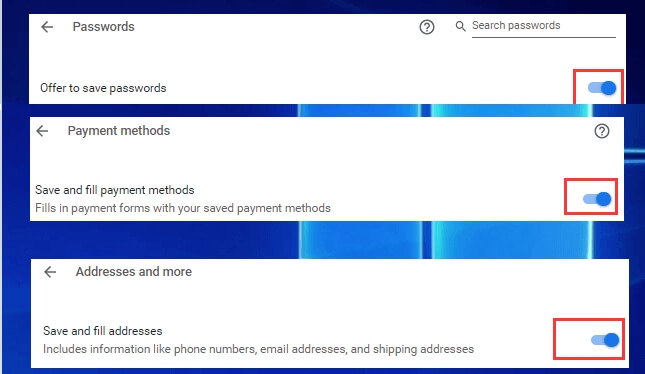
Как полностью отключить автозаполнение Google на Mac
Шаг 1. Откройте настройки: следуйте инструкциям, чтобы получить доступ к настройкам «Автозаполнение».
Шаг 2. Отключить автозаполнение: отключите параметры «Пароли», «Способы оплаты», «Адреса и многое другое».
План Б: удаление автозаполнения Google и автозаполнения других браузеров в один клик.
Установите инструмент для очистки: Загрузите и установите надежный инструмент, например Очиститель Macube.
Macube Cleaner — универсальный инструмент для очистки Mac, который эффективно удаляет данные автозаполнения из различных браузеров. Он также просматривает и очищает кеш браузера, файлы cookie и историю. Благодаря интеллектуальному сканированию он удаляет ненужные файлы, находит забытые большие старые файлы, дубликаты и подобные фотографии. Кроме того, он может легко удалить упорное и вредоносное программное обеспечение.
Скачать Бесплатно Скачать Бесплатно
Ключевая особенность
- Расширенная интеллектуальная функция сканирования, полностью удаляющая ненужные файлы на Mac.
- Позволяет настроить дублирование похожих файлов, экономя больше места.
- Он может удалять вложения электронной почты, такие как фотографии, видео, PDF-файлы, ZIP-файлы и т. д.
- Вы можете быстро удалить ненужные файлы одним щелчком мыши, чтобы максимально увеличить пространство для хранения на вашем Mac.
Запустите инструмент:
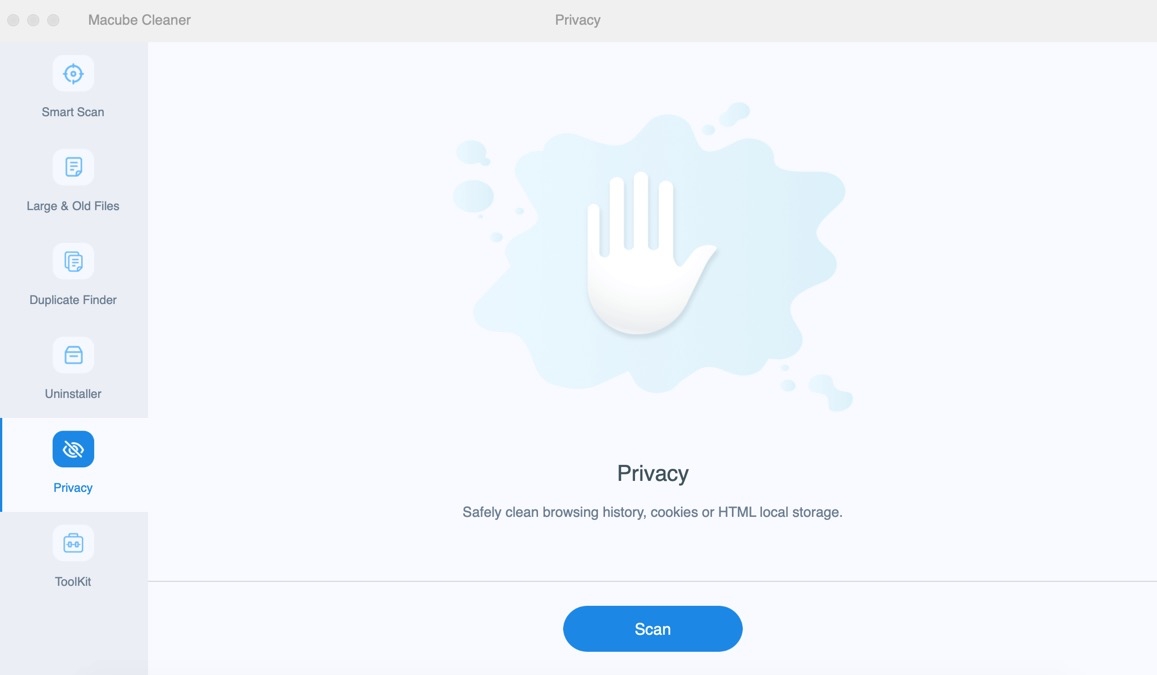
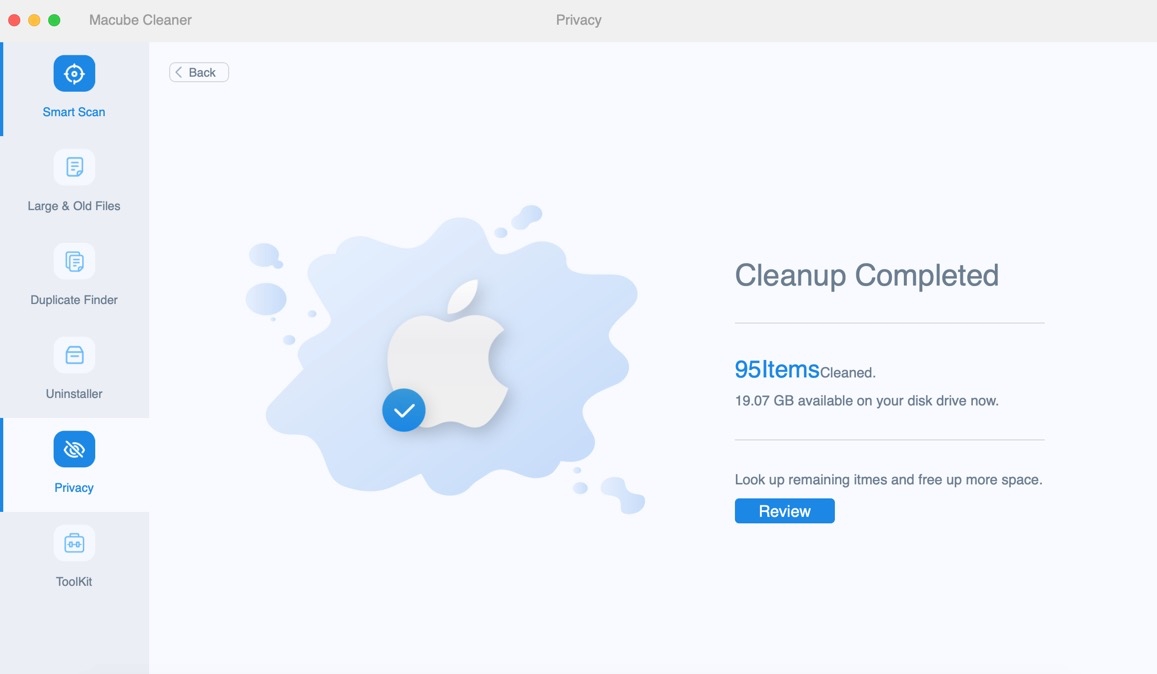
Шаг 1. Откройте Macube Cleaner и выберите «Конфиденциальность».
Шаг 2. Проверьте параметры автозаполнения данных в Google Chrome.
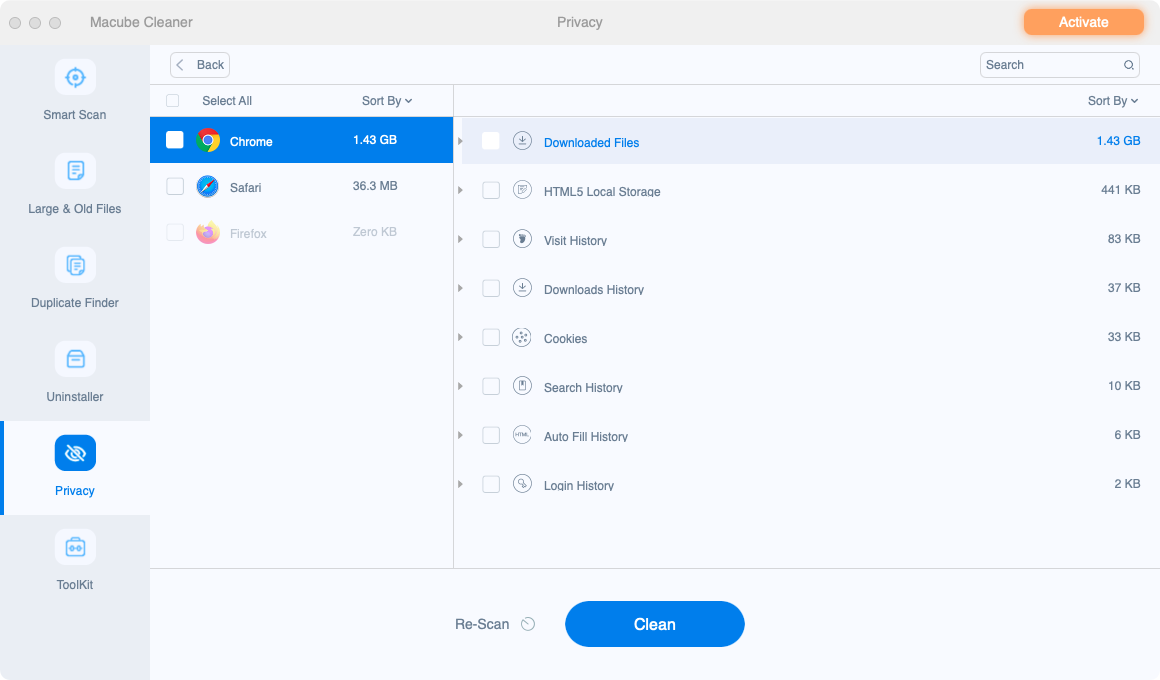
Шаг 3. Нажмите «Очистить».
Часть 3. Очистка автозаполнения Firefox на Mac
Firefox предлагает инструменты для управления данными автозаполнения для повышения конфиденциальности. Вот как это сделать:
Шаг 1. Запустите Фаерфокс.
Шаг 2. Нажмите значок меню (три горизонтальные линии) и выберите «Параметры».
Шаг 3. В меню выберите «Конфиденциальность и безопасность».
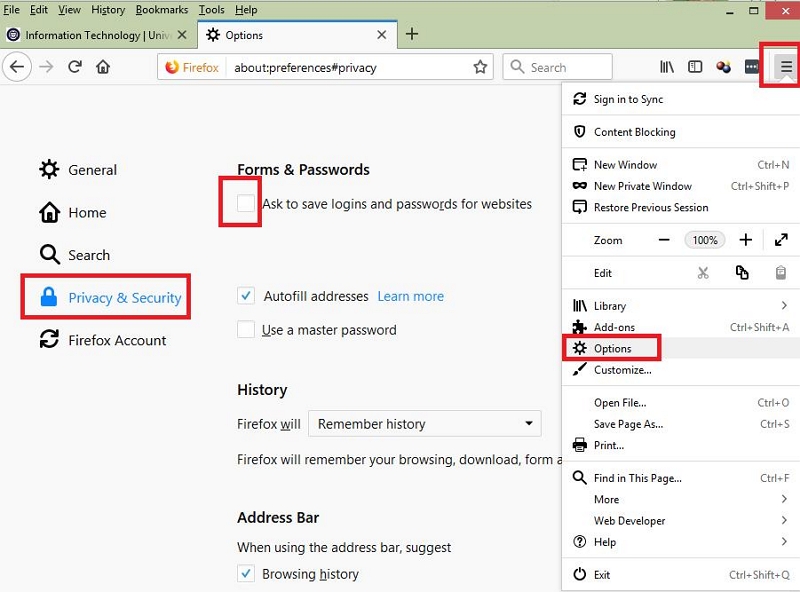
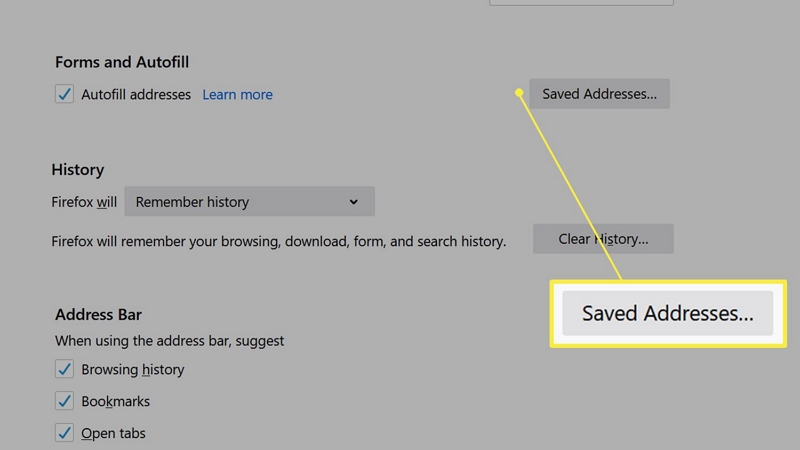
Шаг 4. Удалить сохраненные логины: нажмите «Сохраненные логины» и «Сохраненные адреса», чтобы удалить все записи, которые вам больше не нужны.
Как отключить автозаполнение Firefox на Mac
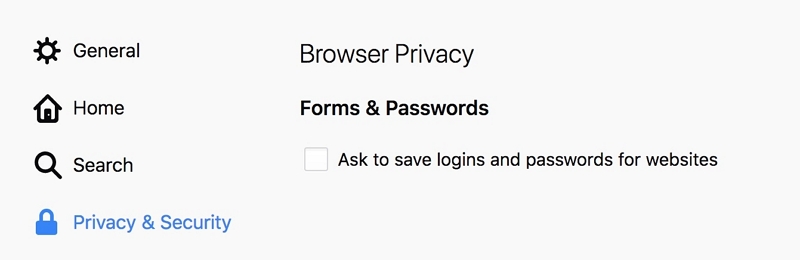
Шаг 1. Следуйте инструкциям, чтобы получить доступ к настройкам «Конфиденциальность и безопасность».
Шаг 2. Снимите галочки для сохранения адресов и данных для входа.
Часть 4. Удаление автозаполнения Edge на Mac
Повысьте конфиденциальность просмотра, очистив данные автозаполнения в Microsoft Edge:
Шаг 1. Запустите Microsoft Edge.
Шаг 2. Доступ к настройкам: нажмите значок меню (три точки) и выберите «Настройки».
Шаг 3. Перейдите к «Конфиденциальность, поиск и службы». Выберите эту опцию на боковой панели.
Шаг 4. Очистить данные просмотра: нажмите «Выбрать, что очистить» в разделе «Очистить данные просмотра».
Шаг 5. Выберите «Данные формы автозаполнения». Установите флажок «Данные формы автозаполнения (включая формы и карточки)».
Шаг 6. Нажмите «Очистить сейчас», чтобы удалить данные автозаполнения из Microsoft Edge на вашем Mac.
Как отключить автозаполнение Edge на Mac
Шаг 1. Нажмите на значок «Настройки и многое другое» (три точки в правом верхнем углу).
Шаг 2. В раскрывающемся меню выберите «Настройки».
Шаг 3. Убедитесь, что в меню по умолчанию установлено значение «Профили». Если нет, выберите «Профили» на левой боковой панели.

Шаг 4. В разделе «Ваш профиль» нажмите на каждый из следующих элементов и отключите их:
- Пароли
- Информация о платеже
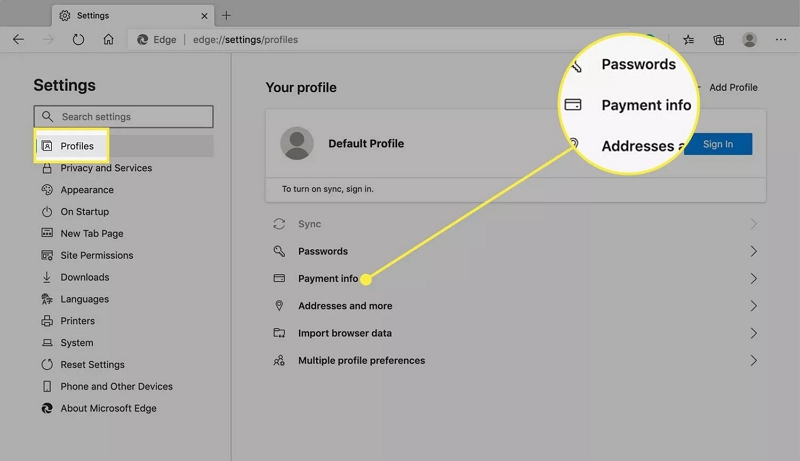
Шаг 5. Ваши настройки будут сохранены автоматически.
Часть 5. Управление автозаполнением Safari на Mac
Автозаполнение в Safari может упростить вашу работу в Интернете, но управление этими данными имеет решающее значение для обеспечения конфиденциальности. Выполните следующие действия, чтобы управлять информацией автозаполнения и удалять ее в Safari на вашем Mac:
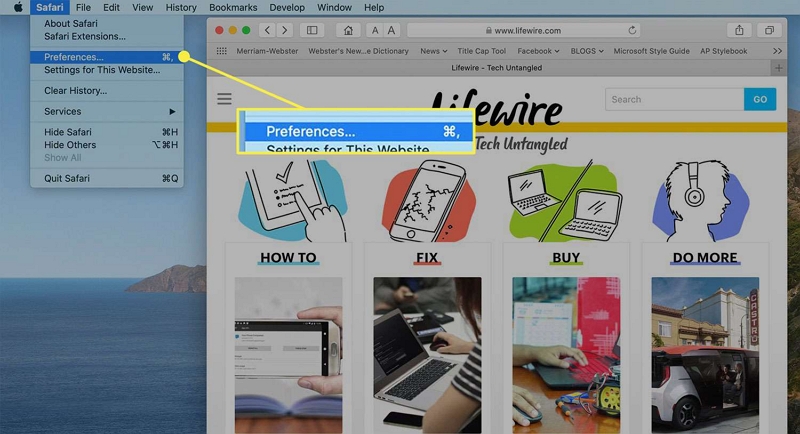
Шаг 1. Откройте Сафари.
Шаг 2. Нажмите «Safari» в верхней строке меню и выберите «Настройки».
Шаг 3. Выберите вкладку «Автозаполнение» в окне настроек.
Шаг 4. Управление данными автозаполнения:
- Для получения контактной информации нажмите «Изменить» рядом с пунктом «Использование информации из моих контактов» и удалите ненужные записи.
- Для имен пользователей и паролей нажмите «Изменить» рядом с «Имена пользователей и пароли» и удалите записи, которые вам больше не нужны.
- Чтобы получить информацию о кредитной карте, нажмите «Изменить» рядом с пунктом «Кредитные карты» и удалите устаревшие или ненужные карты.
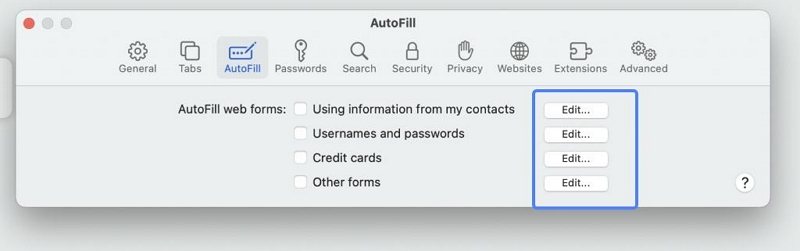
Шаг 5. Нажмите «Готово», как только вы закончите вносить изменения.
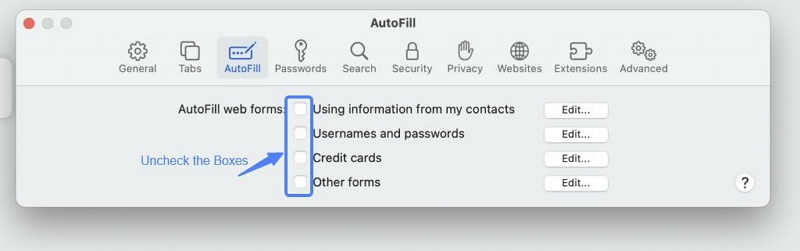
Как отключить автозаполнение Safari на Mac
1. Откройте настройки автозаполнения: следуйте инструкциям, чтобы получить доступ к настройкам автозаполнения.
2. Отключите автозаполнение. Снимите флажки для использования автозаполнения контактной информации, имен пользователей и паролей, а также кредитных карт.
Заключение
Для каждого браузера требуется свой процесс очистки, поэтому вам необходимо регулярно повторять эти шаги и запоминать их. Альтернативно, использование Macube Cleaner может упростить эту задачу. Одним щелчком мыши вы можете очистить все записи конфиденциальности браузера, включая автозаполнение, избавив свой мозг от необходимости запоминать несколько шагов.
Macube Cleaner
Speed up and troubleshoot your Mac super easily with a Macube full-featured free trial!
Start Free Trial