Just like every other computer system, Mac computers can automatically remember passwords and connect to WiFi networks you've previously connected to whenever you're in range.
While this feature can be convenient, you might want to forget a network for the sake of your privacy security. To declutter your network list, or improve your system’s performance.
To help you out, we've prepared this guide to walk you through the process of forgetting WiFi networks on Mac using three different methods. You'll also discover the best tool to protect online privacy when connecting to WiFi networks.
Part 1: Why Does Mac Remember Wi-Fi Networks?
When you connect to a Wi-Fi network on your Mac, it is automatically added to your list of preferred networks, allowing you to join the network seamlessly whenever it is in range.
The purpose of the auto-connect feature is to enhance user convenience and eliminate the need for manual network selection or password entry each time you encounter a known network.
Part 2: When You Need to Forget a Wi-Fi Network on Mac?
There are several reasons why you might need to forget a Wi-Fi network on your Mac. We've discussed three common scenarios where forgetting a network can be beneficial below.
Improve Your Security and Privacy
One of the main reasons to forget a Wi-Fi network is to enhance your security and protect your privacy. Yes, Wi-Fi networks can be compromised with malicious attacks and viruses, which could put your data at risk. So, by regularly removing these networks from your list of preferred networks, you can avoid accidentally connecting to malicious Wi-Fi networks and mitigate potential security threats. Forgetting network is especially crucial for public networks that are prone to data sniffing and unauthorized access.
Organize Your Network List
Over time, your Mac's list of preferred networks can become cluttered with networks you no longer use or that are no longer available.
Forgetting unnecessary networks can help you declutter and organize your network list, making it easier to find and connect to the networks you frequently use. Besides, a clean and organized network list can streamline your network selection process and improve your overall experience.
Optimize Your Performance and Battery Life
Not all Wi-Fi networks offer the same performance and signal strength. Some networks may be slow, congested, or have weak signal reception.
When you forget slow and contested Wi-Fi networks, your system will be able to automatically connect to faster and more reliable networks, allowing you to enjoy a smoother online experience and save your Mac’s battery power.
Part 3: How to Forget a Wi-Fi Network on Mac? [3 Best Methods]
Forgetting a Wi-Fi network on your Mac can be done using different methods. Here, we'll guide you through the process using three of the most effective methods: System Preferences, Terminal, and a quicker way.
Method 1: Forget Wi-Fi Network on Mac Using System Preferences
The System Preferences app provides a straightforward way to forget a Wi-Fi network on your Mac. Follow these steps:
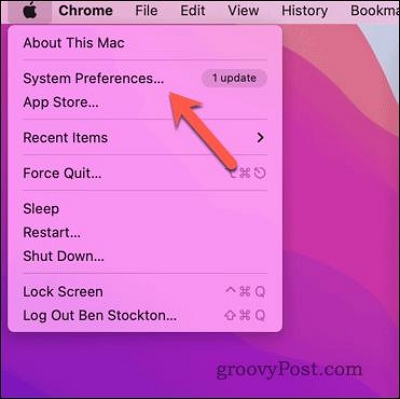
Step 1: Click on the "Apple menu" icon in the top-left corner of your screen and select "System Preferences."
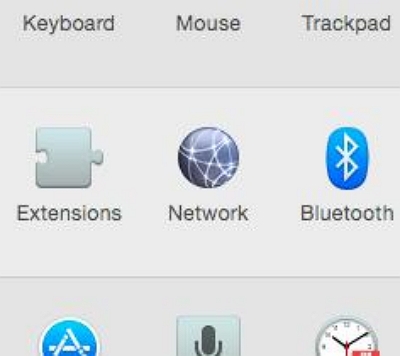
Step 2: In the System Preferences dialog, click on "Network."
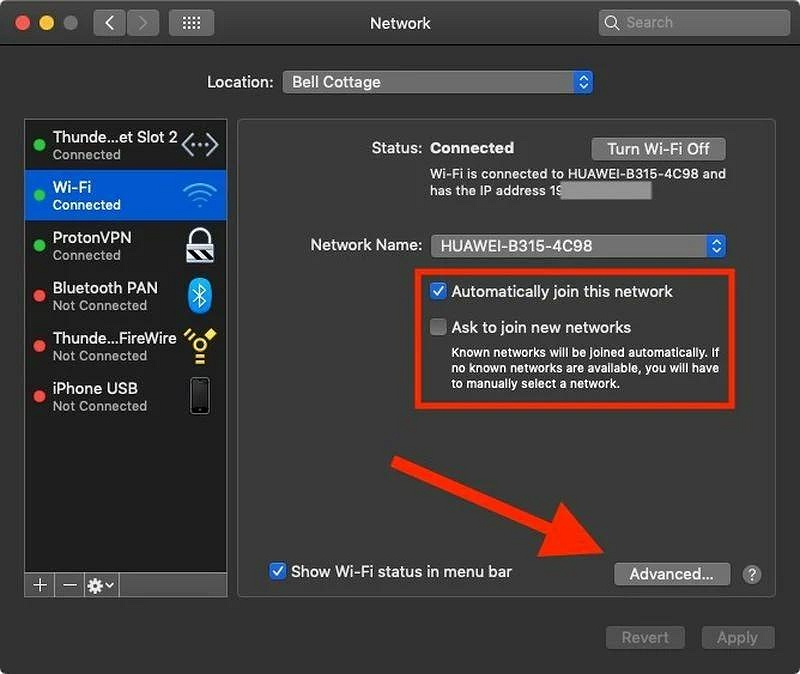
Step 3: On the Network page, select "Wi-Fi" from the sidebar. Then, click on "Advanced" in the bottom-right corner of the window.
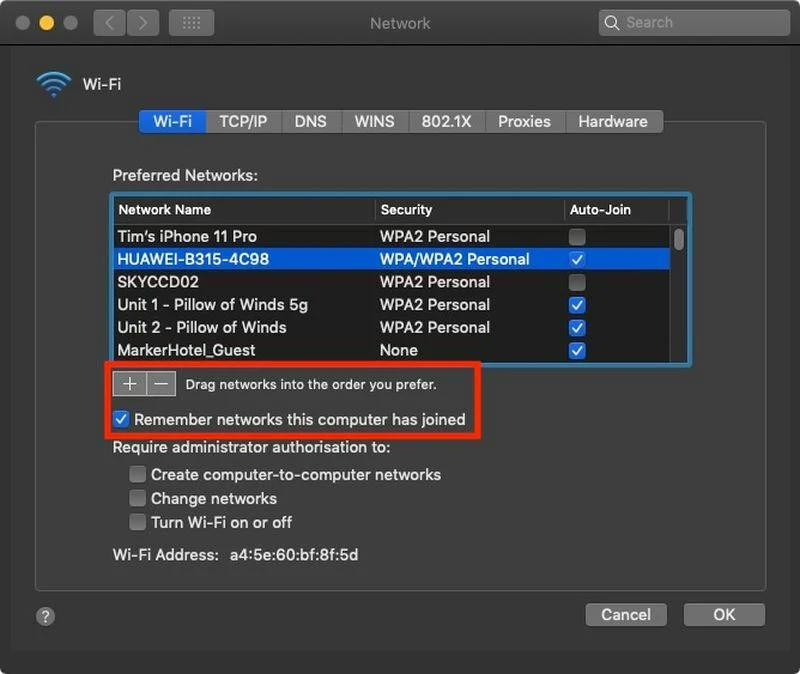
Step 4: Click on the Wi-Fi tab and scroll through the list of preferred networks to locate the network you want to forget.
Step 5: Select the network and click the minus ("-") button below the list. Then, confirm the action by clicking "OK" and then "Apply."
Repeat the process for any other networks you wish to remove.
Method 2: Forget Wi-Fi Network on Mac Using Terminal
If you're versatile at using command lines, the built-in Terminal feature on your Mac can help you to forget Wi-Fi networks within a few clicks. Here is how you can operate efficiently;
Step 1: Launch Terminal from the Applications > Utilities folder in the Launchpad.
- Alternatively, you can use Spotlight Search by pressing Command + Space and typing "Terminal" to find and open the app.
Step 2: In the Terminal window, type "networksetup -listpreferredwirelessnetworks en0" (without quotes) and press Enter. This command will display a list of preferred wireless networks your Mac remembers.
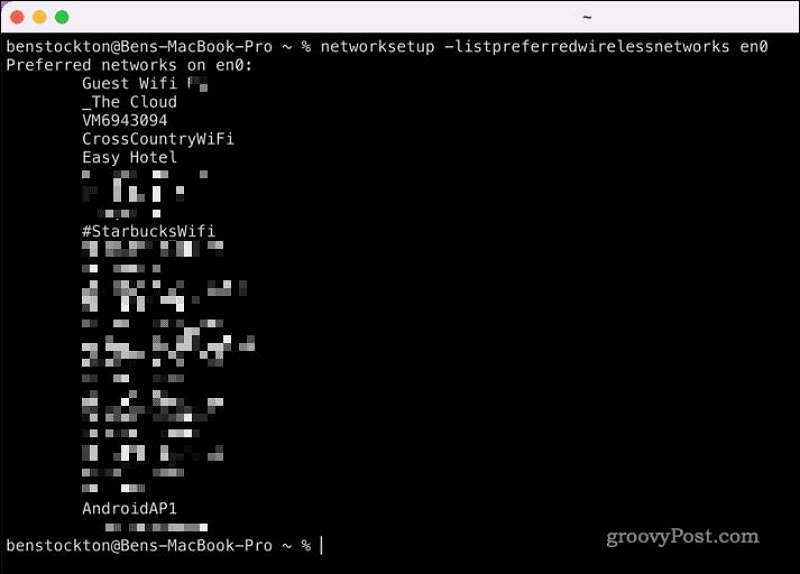
Step 3: If the previous command doesn't work, try replacing "en0" with "en1" in the command and press Enter.
Step 4: Identify the network you want to forget and copy its name exactly as it appears, including spaces and punctuation.
Step 5: Next, type "networksetup -removepreferredwirelessnetwork en0 'Network Name'" (replace 'Network Name' with the actual name of the network you copied) and press Enter.
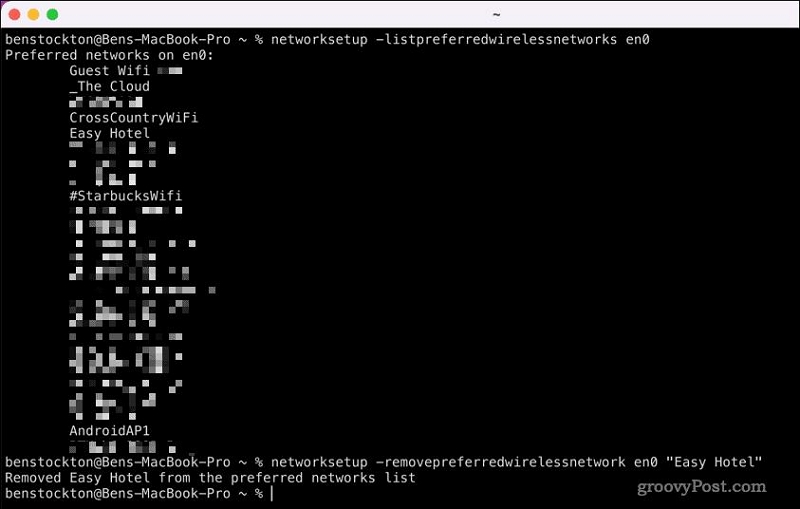
Step 6: The Terminal will display either "Preferred wireless network has been removed" or "Failed to remove preferred wireless network" depending on the outcome.
 Note:
Note:
- Ensure to double-check the network name and follow the steps accurately for a successful removal.
Method 3: Quicker Way to Forget Wi-Fi Network on Mac
Besides using Apple Menu and Terminal, there's a quicker way to forget Wi-Fi network on Mac. This method provides a convenient and efficient way to forget Wi-Fi networks without navigating through menus or using Terminal commands. All you just need is to do the following;
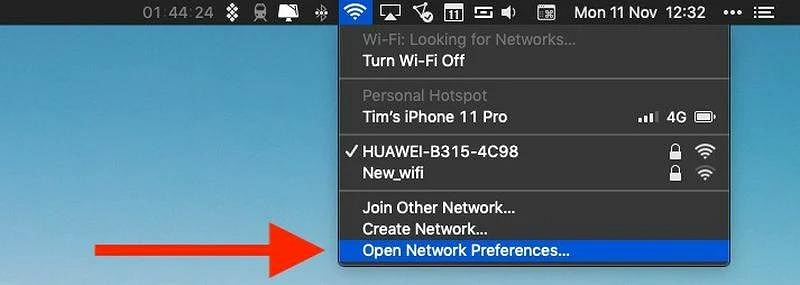
Step 1: Click on the Wi-Fi icon in the menu bar at the top-right corner of your screen. Then, select “Open Network Preferences”.
Step 2: In the new Window that appears, select Wi-Fi from the left pane and click on “Advanced” at the bottom right corner.
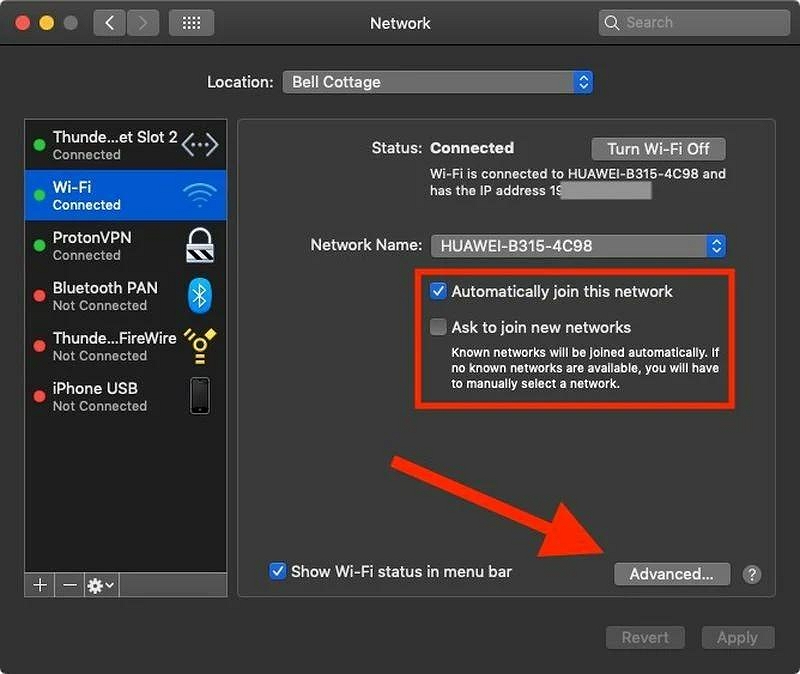
Step 3: Choose the “Network” you wish to forget. Then, click the “Minus (-)” sign. Then, click on Ok > Apply to finish the operation.

Bonus: Easily Protect Your Online Privacy with Macube Cleaner
In addition to forgetting Wi-Fi networks, you can take your privacy protection on Mac to the next level with Macube Cleaner.
Macube Cleaner is a versatile tool that optimizes your Mac's performance while safeguarding your online privacy using smart technology and an advanced privacy protector. This tool’s built-in privacy feature can help you securely erase sensitive data, clear browsing history, and remove digital footprints to protect your privacy.
Additionally, Macube Cleaner plays a huge role in helping you clean up your Mac storage using features like a file shredder to totally remove unwanted files and make them unrecoverable, an app uninstaller to uninstall apps and their associated files, a duplicate file finder to detect and remove duplicate files, and lots more.
Step 1: Launch the software program. Select “Privacy” from the left pane and click on the “Scan” button.
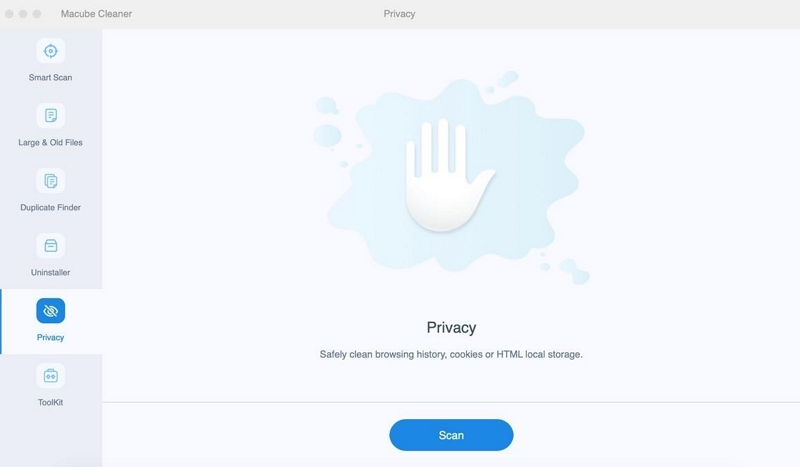
Step 2: Once you click the “Scan” button, the software will begin to scan your Mac browsers for sensitive data, including cache files, cookies, history, downloads, and lots more.
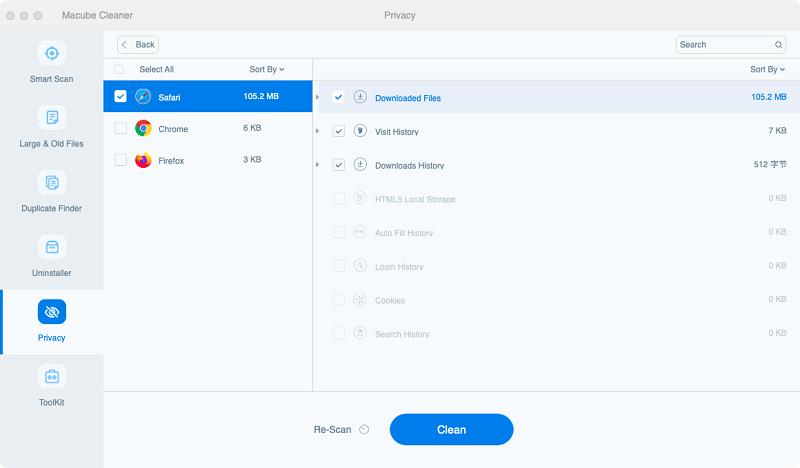
Step 3: Finally, select the browser where you want to clear your history from. Then, tick the checkboxes next to auto-fill history, visit history, download files, etc. Click “Clean” to complete the operation.
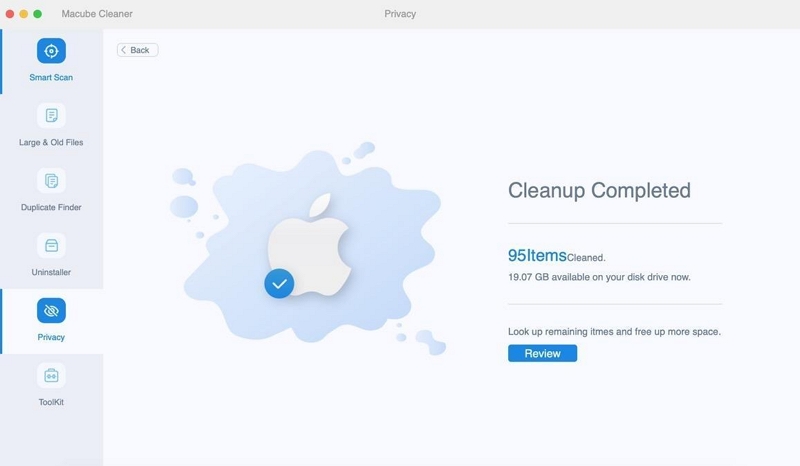
Overall, incorporating Macube Cleaner into your privacy routine ensures a clean and secure online experience on your Mac.
Conclusion
By forgetting a Wi-Fi network on your Mac, you can enhance security, declutter your network list, and optimize performance. Whether you choose to use System Preferences, Terminal, or the quicker method, you can easily remove unwanted networks from your preferred list.
Also, if you’re looking for an all-in-one privacy solution to protect your online activities and maintain a secure digital environment, Macube Cleaner allows you to enjoy a safer and more efficient Wi-Fi experience on your Mac.

Macube Cleaner
Speed up and troubleshoot your Mac super easily with a Macube full-featured free trial!
Start Free Trial