Accumulation of junk files can compromise your Mac system functions. Yes, such files can take up valuable storage space and slow down your Mac’s performance. But, fortunately, there are several free and smart ways to delete junk files on your Mac.
In this guide, we will introduce you to all you need to know about junk files on Mac and show you different techniques to delete them without compromising your system’s activities. All you just need to do is to stick with us!
Part 1: What Are Junk Files?
Junk files refer to unnecessary and often temporary files that accumulate on digital devices over time. These files serve no practical purpose and can consume valuable storage space, slowing down device performance. Common types of junk files include cache files, log files, outdated backups, and temporary installation files. They can result from app usage, system processes, and internet browsing.
Part 2: Reasons Why You Should Delete Junk Files on Mac
Deleting junk files on your Mac is essential for several reasons, including;
- Free Up Space: Junk files take up valuable storage, reducing available space for important data and applications.
- Maximize Efficiency: Accumulated junk files can slow down your Mac, affecting its speed and responsiveness.A cleaned-up system runs more efficiently, benefiting both your productivity and user experience.
- Improve Stability: Removing unnecessary files can help prevent crashes and system errors caused by cluttered storage.
- Extend Lifespan: Regular cleaning minimizes wear and tear on your storage drive, potentially prolonging its lifespan.
- Privacy Protection: Some junk files may contain malware or vulnerabilities, which can pose a security threat to the system and may lead to personal privacy disclosure. Removing them reduces the risk of data breaches.
- Foster Organization: Clearing clutter leads to a more organized file structure, making it easier to find what you need.
Part 3: Smart Way to Clean Junk Files On Mac
If you're looking for a straightforward way to clean junk files on Mac, we got you covered with a smart technique to operate. All you need is the powerful Macube Cleaner software.
Macube Cleaner is a comprehensive storage optimization software for Mac that can come in handy for cleaning junk files, removing duplicate contents, uninstalling stubborn software, and lots more. This tool provides you with efficient features to free up mac storage and give your mac a new lease of life. And you don't need to be tech-savvy to utilize it.
Besides, unlike regular Mac disk cleaning tool, Macube Cleaner offers a smart scan technology that allows you to find and remove junk automatically without hassles.
Key Features:
- Efficiently clean junk files on Mac ,including browser history, app residue caches, email downloads, iMessages, etc. in a few seconds by using modern smart scan technique.
- Besides junk files, Macube Cleaner can also remove duplicate files, large & old files, and uninstall stubborn apps easily.
- Preview junk files before deletion.
- Supports advanced files shredder to completely delete unwanted files from Mac storage and make them unrecoverable.
Step 1: Install Macube Cleaner software tool on your Mac and launch it.
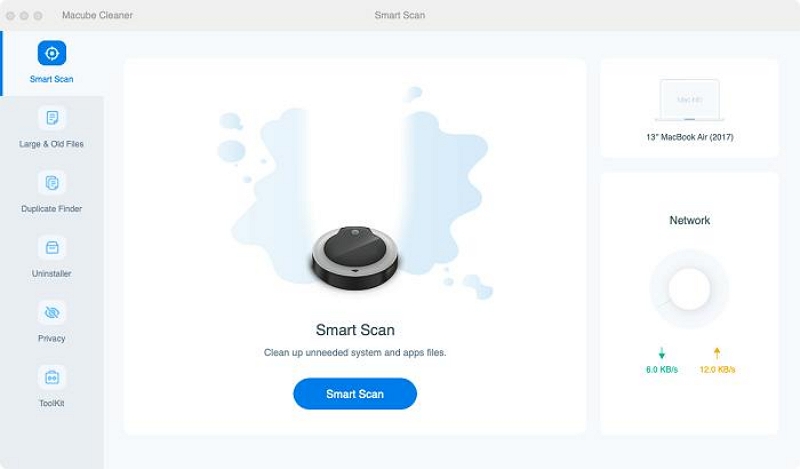
Step 2. Click the Smart Scan feature at the left pane. Then, click “Smart Scan ” button to enable app to start scanning your Mac for junk files.
Step 3. After scanning, the program will display all the junk files on your system in different categories. You can preview each files by clicking the magnifying glass next to them.
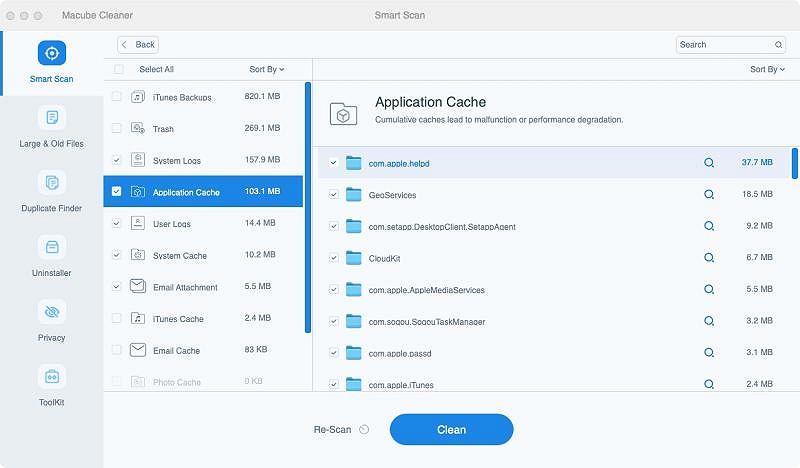
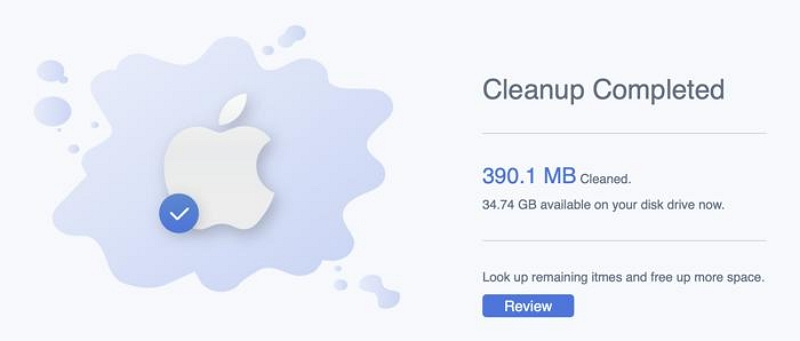
Step 4. Finally, select the junk files that you don't need, and click “Clean”. Then, wait a few seconds for the cleanup to complete.
Part 4: Free Way to Manually Clean Junk Files On Mac
You can also clean junk files on Mac for free by using the manual technique. But keep in mind that the process is quite lengthy.
Let's dive right in to find out how this method works.
Step 1: Remove User Log Files
The first step to manually clean junk files on Mac is by removing user log files. Log files usually contain a history of activities transpiring on your system, ranging from transactions to errors, and intrusions.
Follow the instructions below to remove user log files from your Mac;
- Open Finder app and press Command + Shift + G.
- Enter the following command and click on “G0”:
~/Library/Logs
- All your system log files will be displayed on your screen.
- Finally, select all user log files and delete them completely.
Step 2: Clear Cache Files
The next step is to clear cache files. However, there are different types of cache files on Mac, including browser cache, system cache, and user cache. So, get rid of each cache one after the other. The process has been explained below;
How to Clear System Cache on Mac
- Go to Finder and simultaneously press Command+Shift+G on your keyboard.
- Next, type the following command in the field : /Library/Caches.
- Then, click Return.
- All your cache files will be displayed in the window that appears on your screen. Open the folders and delete the system caches from there.
How to Clear User Cache
- Open Finder again and press Command + Shift + G.
- Type the following command and hit run: ~/Library/Caches
- Again, go through the folders and delete the user cache from there.
How to Clear Browser Cache
For Safari Browser
- Go to Safari Browser and select Settings > Advanced.
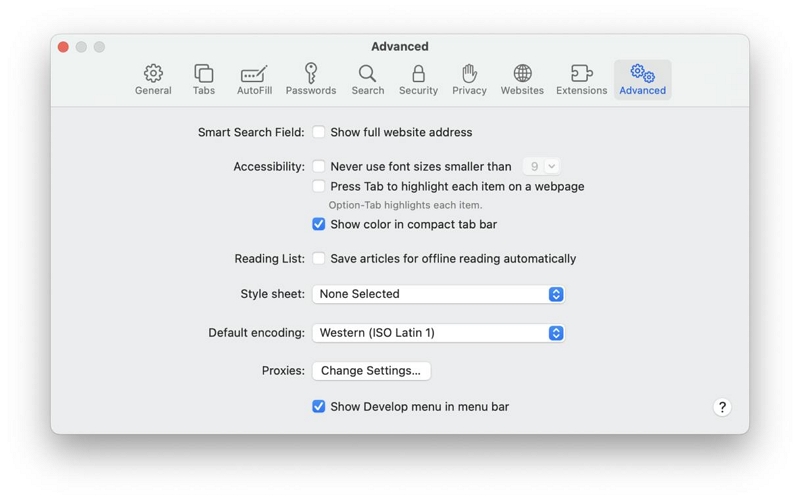
- Tick the check box next to “Show Develop Menu in menu bar”.
- Next, navigate to Develop section and select Empty Caches.
For Google Chrome
- Open Google Chrome and click the three-dot vertical icon at the top right side. Then, select Settings from the drop-down menu.
- Select Privacy and Security from the left pane.
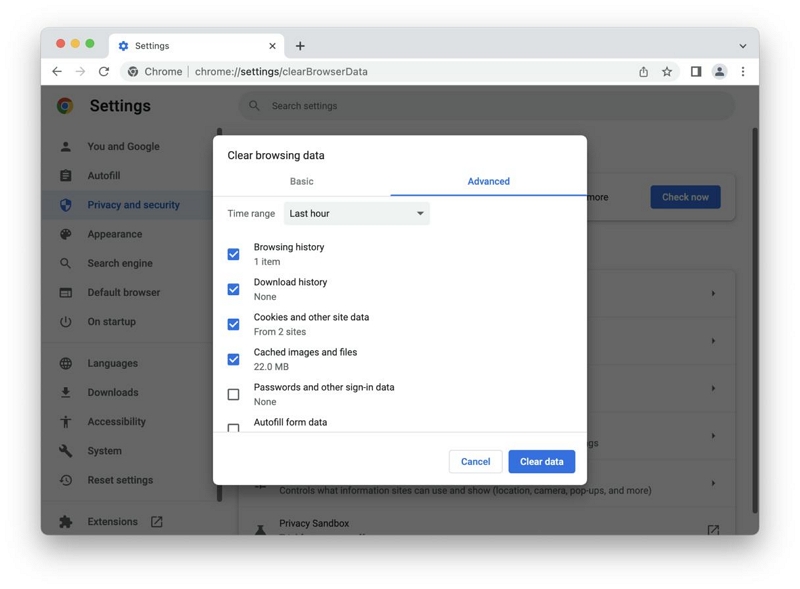
- Tick the checkbox next to Cached Image and Files. Then, select Clear Browsing Data.
- Finally, click Clear Data to finish.
For Firefox
- Open Firefox and click the three-dot horizontal icon at the top right side.
- Select History > Clear recent history.
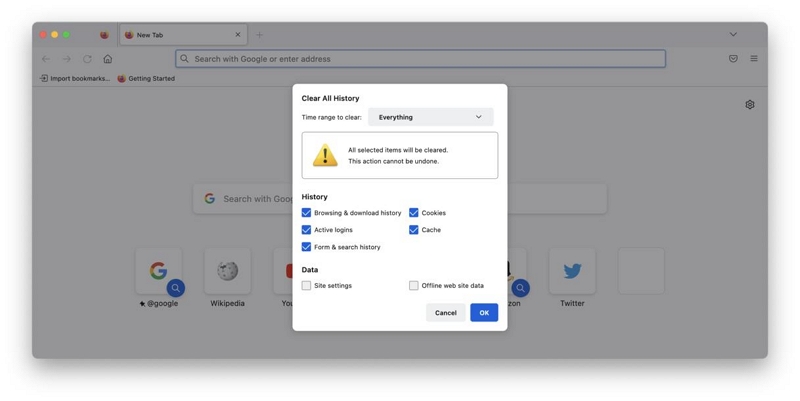
- Tick the check box next to Cache and click Ok to finish.
Step 3: Delete Localization Files
Localization files are files that allow you to set your apps to a preferred language. They are usually stored in app packages and could accumulate over time to become junk on your system.
To delete localization files on your Mac, you need to do the following;
- Open Finder > Applications.
- Right-click on any application and select Show Package Contents.
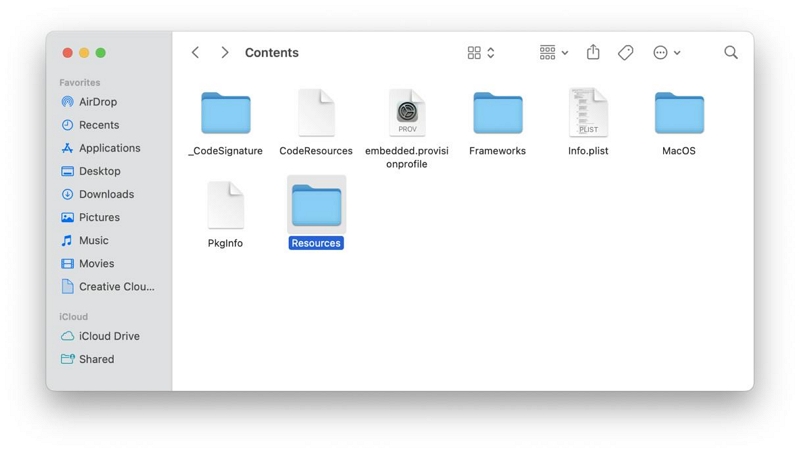
- Locate and open the Resource Folder.
- Find all folders with “lproj” and move them to trash.
- After that, empty the trash to complete the operation.
Step 4: Delete System Log Files
System log files as usually stored on Mac computers for developers to analyze errors with system applications and Mac OS. However, deleting these files is very effective for freeing up storage space on your Mac.
- Open the Finder and navigate to the Go menu. Then, select Go to folder.
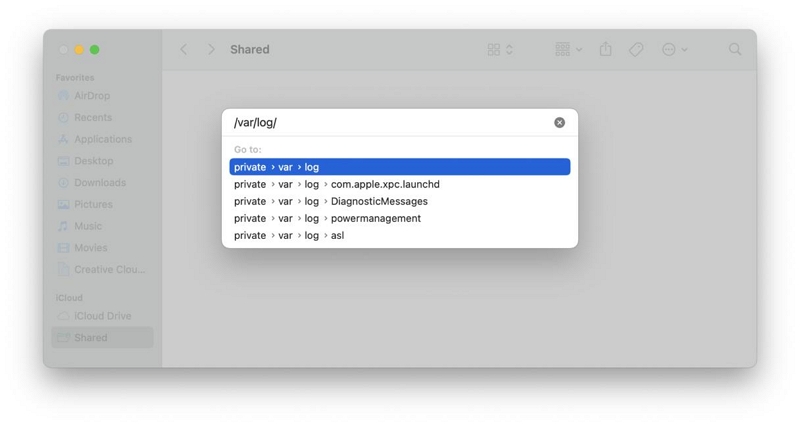
- Type /var/log in the relevant field and click Return.

- All system log files on your Mac should be displayed on your screen. Select the ones you wish to delete and move them to trash
- Delete trash after that.
 Note:
Note:
- Deleting system log files manually could result in accidental deletion of important data. So, it's advisable you backup your Mac before commencing the operation.
Step 5: Remove Unused .DMGs
Removing unused “.DGMs” (Disk Images) is another effective way to remove junk files from Mac. Here is how to do it;
- Open your desktop and press Command + F.
- Select “This Mac” and click the “+” icon from the right-hand side.
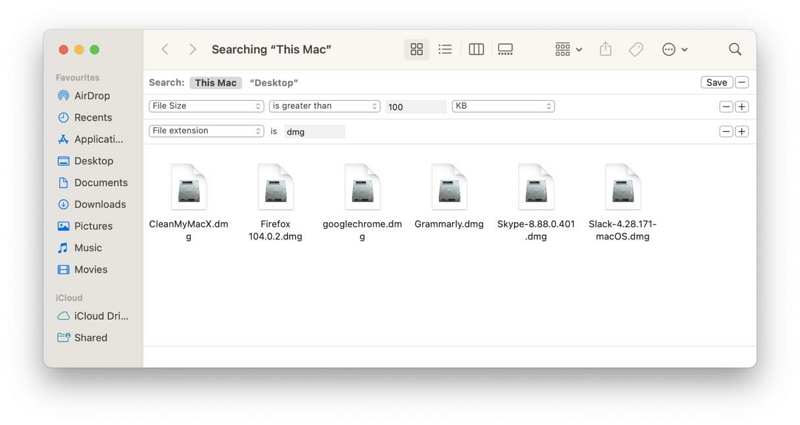
- Select File Extension from the drop-down menu.
- Type “DMG” and preview the results. Then, delete images of apps installed.
Step 6: Delete Apps Leftovers
Unfortunately, not all Mac users know that deleting apps by sending them to trash does not remove all files of the uninstalled application.
To completely delete an app from your Mac, you need to delete its leftovers. You can do this by doing the following;- Go to Finder app and navigate to the Go menu. Then, select Go to Library.
- Paste the following command one after the other:
~/Library/Application Support
~/Library/Caches/
~/Library/Caches
~/Library/Internet Plug-Ins/
~/Library/
~/Library/Preferences/
~/Library/Application Support/CrashReporter/
~/Library/Saved Application State/
Check the folders containing name of the apps you deleted previously and move them to trash. Then, empty the trash afterward.
Step 7: Delete Large and old file
Accumulation of large and old files on your Mac could also result in junk. So, if you have any large files on your Mac that you haven't opened for a while, it's advisable to delete them. But this might take a lot of time to complete using the manual method.
To operate more efficiently, we recommend using Macube Cleaner. The tool boasts a built-in large and old files finder that allows you to find and remove large and old files quickly and easily. Here is how t use Macube Cleaner;
- Open Macube Cleaner and select Large & Old Files from the left side.
- Click the “Scan” button to initiate the scanning process.
- Once the scan is complete, all large and old files on your Mac will be shown on your screen.
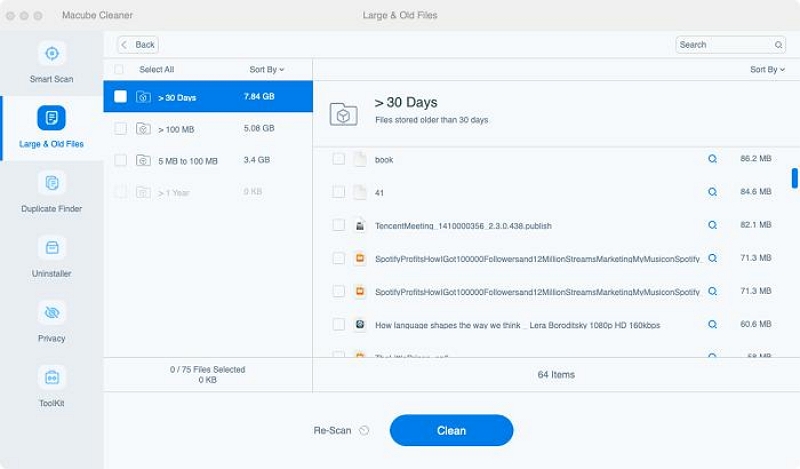
- Preview the scanned results and select the ones you wish to delete. Then, click “Clean” to finish. It's as simple as that!
Step 8: Remove Xcode Junk
If you use Xcode regularly, chances are your disk space your Mac disk is filled with old caches and junk generated by Xcode.
You can remove Xcode junk from your library via the following paths:
- ~/Library/Developer/Xcode/DerivedData
- ~/Library/Developer/Xcode/Archives
- ~/Library/Developer/Xcode/iOS DeviceSupport
- ~/Library/Developer/CoreSimulator
- ~/Library/Caches/com.apple.dt.Xcode
- ~/Library/Application Support/MobileSync/Backup
Conclusion
Ultimately, the guide above have covered every possible ways to clean junk files on Mac without hassles. Whether you're looking to get the job done manually or with a smart tool, you don't need to be tech-savvy to operate. All it takes is only a few clicks!

Macube Cleaner
Speed up and troubleshoot your Mac super easily with a Macube full-featured free trial!
Start Free Trial