Sharing attachments has been easier than ever before. In these days, we can share photos, GIFs, stickers, videos, text files, documents and even eBooks to our friends and family without limitation. Despite the accessibility of sharing attachments, there is a caveat as these files accumulate in our iPhones and start taking up space little by little. Eventually, one day you see the error message saying your phone is out of storage space. Even before that, your iPhone becomes slow and freezes/crashes often. It can take longer to start up.
If you share photos, stickers and GIFs constantly and have multiple mail accounts and mailboxes it can get extremely complicated and difficult to review which attachments are important and which ones are not. In this regard, iPhones’ internal attachment management system is not very intuitive if you have a significant number of large files.
If this sounds like the issue you are facing, this is the article for you. Here we will look at some solutions to review and delete large attachments from emails and messages on your iPhone. You can accomplish this in two ways:
- The smart and streamlined way through Eassiy Phone Transfer (recommended)
- The manual way through iOS settings.
Part 1: Smart Way to Review/Delete Large Attachments in Email or iMessage on iPhone
First, let’s tackle the smart way on how to delete large attachments on iPhone and how to review large attachments in emails and iMessage on iPhone. You can easily perform this with Eassiy Phone Transfer.
Before we talked about some of the difficulties of having to delete large attachments on your iPhone:
- You have to manually find the files, or have to go to your iPhone settings to find the large files
- iOS settings may not have the option to select all files at once. So, you have to select them manually
- You have to wait for your iPhone to take a while as it deletes them. During this time, you are not able to do anything in your iPhone.
- Furthermore, if you are using other third-party apps to share GIFs, stickers, photos, videos and other file attachments, you will not be able to use built-in iPhone features to manage them. You have to go to the app’s settings, or manually go through the file management app to locate where the attachments from those apps might be.
Eassiy Phone Transfer bypasses all these issues and make sures all these processes are completed within seconds so you can save precious time. So, why Eassiy?
Eassiy Phone Transfer is one of the most popular and efficient software solutions for both iPhone and Android phones worldwide. It is an all-in-one package for a wide array of phone management operations, such as cross-platform backup and wireless transfer. Having all the phone management capabilities, Eassiy is a more powerful tool than stock iPhone management tools like iTunes. Recommended by top tech journals, Eassiy Phone Transfer can be the go-to solution for all your iPhone management requirements.
Features:
- Manage, backup and restore your contacts from iPhone to computer and manage duplicate contacts on your iPhone.
- Cross-platform transfers without limitation, i.e: iOS to iOS, iOS to Android, iPhone to MacOS, etc.
- All-in-one phone management software that can deal with a wide-range of file types such as photos, videos, audio files (music, audiobook), contacts, messages, audio memos and so on.
- Built-in file management toolsets such as HEIC converter and ringtone maker.
- Unlimited transfers and backups of phone files and contacts.
- Review and selectively transfer iPhone data.
- Powerful wireless transfer capabilities.
Steps to Review/Delete Large Attachments in Email or iMessage on iPhone:
With Eassiy Phone Transfer, you can easily review and delete large attachments from email and iMessage on iPhone. Here are the steps on how to review and delete large attachments:
Step 1: Download and install Eassiy Phone Transfer on your PC. Launch the software. Connect your iPhone to the device using USB and allow the app the permission to access your device folders. If the connection is successful, you will see your phone’s details on the window.
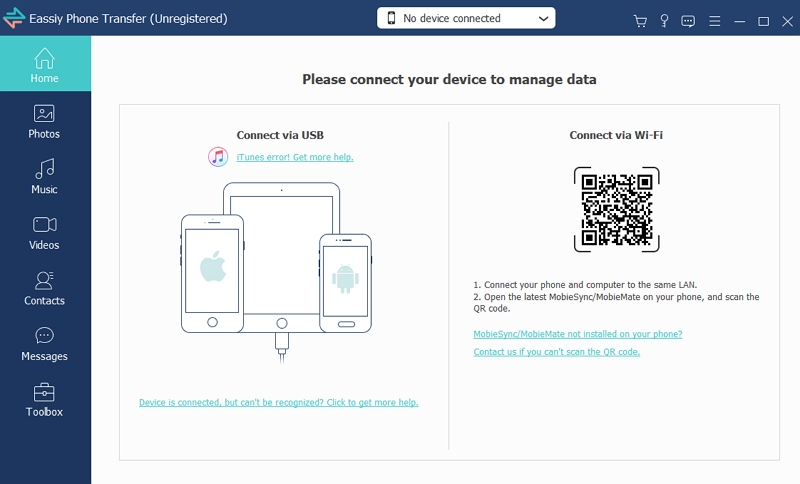
Step 2: Eassiy Phone Transfer will read your device and collect all the files that are existing on your iPhone. You will see a categorised list of files by their types.
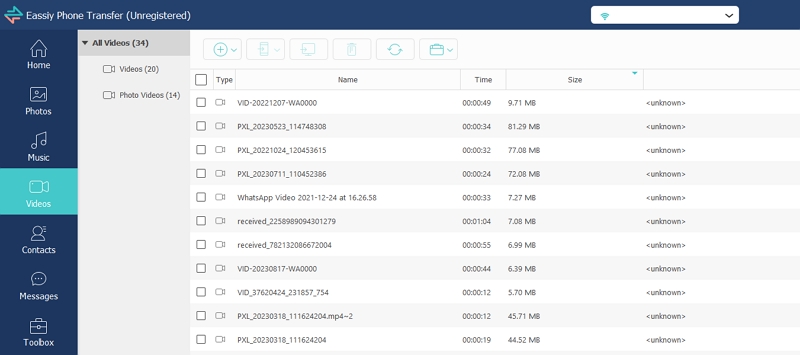
Step 3: You can sort the files according to their size by clicking on “Size”. Check the file or files that you want to delete.

Step 4: Click on the Trashbin icon on top, and you will get a messagebox asking you for confirmation. Click Yes and the large files will be deleted almost instantly and you will get a message box notifying you that the file has been deleted.
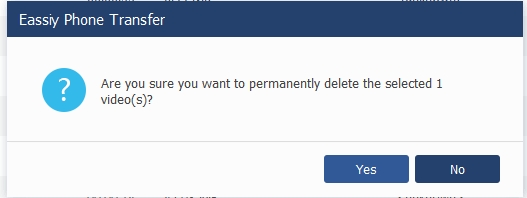
So you can see how easy it was to delete large files from your iPhone. Instead of having to go through each of your photos, videos and files individually, you can use Eassiy Phone Transfer to easily bring all your attachments under a single umbrella and complete your iPhone optimization process in the matter of seconds.
Part 2: Manual Way to Review/Delete Large Attachments in Email on iPhone
If you are tech-savvy and confident iPhone user, you may choose to skip the easy way and try the manual way to review or delete large attachments. There are essentially two ways to do this: through your iPhone Settings option, and through the Files app in iPhone which is the stock file and folder manager of iPhone.
By default, email attachments on iOS are automatically or manually saved in Downloads folder. Therefore, you can only manually delete each attachment from there.
Step 1: In your home screen, go to the Files app.
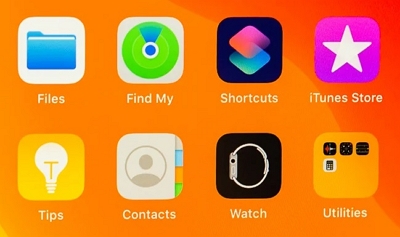
Step 2: Here you have the option to choose from where you want to delete your mail attachment. If they are saved in iCloud, you have to select iCloud Drive. However, we are going to delete mail attachments from our local storage. So, click Downloads under Favourites section.
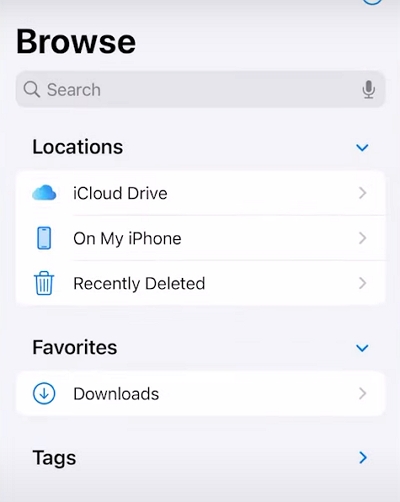
If you don’t see Downloads there, click On My iPhone. You will find the Downloads folder.
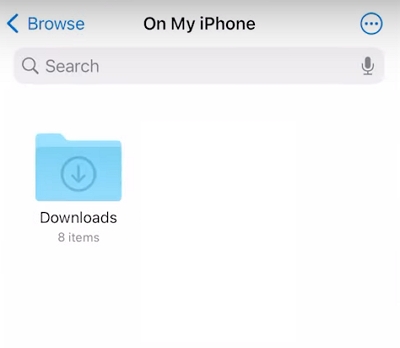
Step 3: Find the file you want to delete and long-press it. You will see a menu bar pop up. Click Delete.
Part 3: Manual Way to Review/Delete Large Attachments in iMessage on iPhone
Similar to the previous section, you can manually review and delete large attachments in your iMessage app.
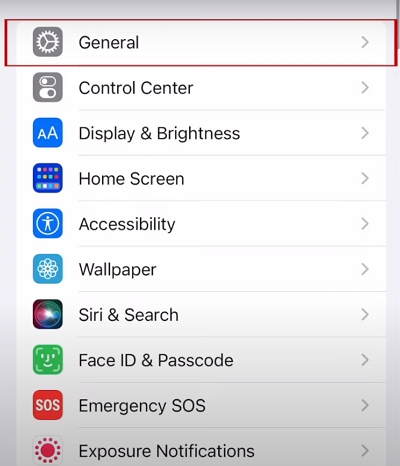
Step 1: Go to your iPhone home screen and click on the Settings icon. Scroll down and Click General.
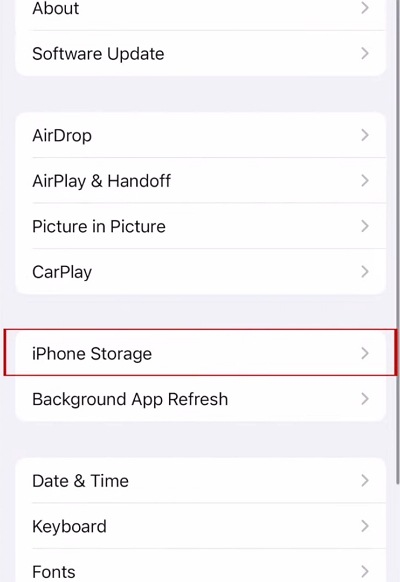
Step 2: Scroll down and click on iPhone Storage.
Step 3: Keep scrolling until you find Messages. Click on it.
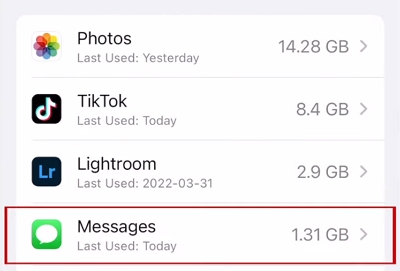
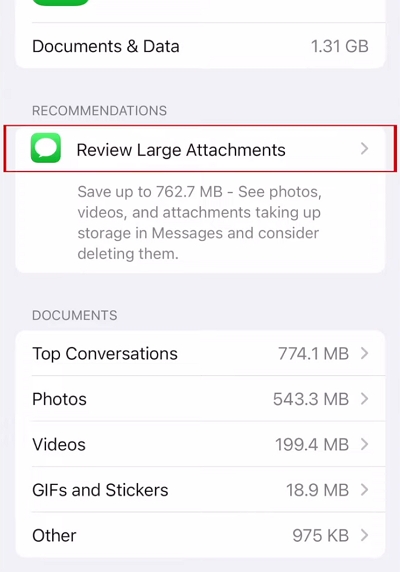
Step 4: You can see which type of files are taking what amount of space. To only review and delete large attachments, click on Review Large Attachments.
Step 5: You can see a list of images, videos or other files which you can review before deleting. To delete the desired file, swipe left and click on Delete.
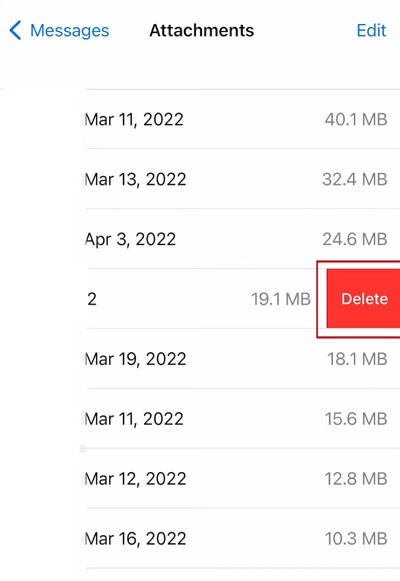
To delete multiple files, click on Edit on top-left and it will give you the option to select multiple files. Select the desired files and click on the trashcan icon.

Keep in mind that depending on how many attachments you have on your iPhone, this can take anywhere between several minutes to several hours.
Part 4: Preventing Accumulation of Large Attachments iPhone
From the previous sections, we saw how we can deal with multiple files that are large sized attachments. If you are prone to sharing attachments on a regular basis through iMessage and the mail app, it is a good idea to make sure that these files don’t accumulate and take up important storage space. For this reason, you should set up measurements to ensure that attachments are not saved automatically all the time, are deleted after a certain period of time, or saved in a compressed way (this is especially applicable to photo files). Fortunately, iOS gives you the ability to manage all these settings. Let us look at several ways you can prevent your attachment files from piling up.
Method 1: Manage Message Storage Duration
Step 1: Go to your iPhone home screen and click on the Settings icon. Scroll down until you see Messages, then click it.
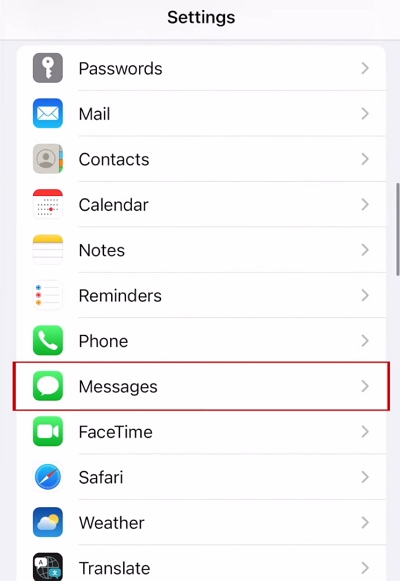
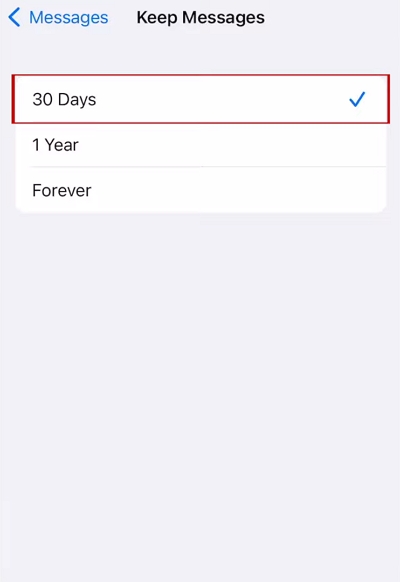
Step 2: Click on Keep Messages.
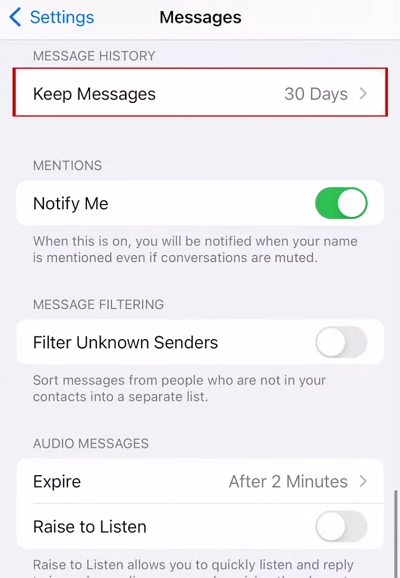
Step 3: This will take you to the message storage duration option. For example, selecting 30 Days will ensure that after 30 days your messages are deleted. Select the desired option.
Method 2: Low Quality Image Mode
You can also choose to save all your image attachments in compressed format to save more space. In Settings > Messages, scroll down until you see Low Quality Image Mode and turn it on.
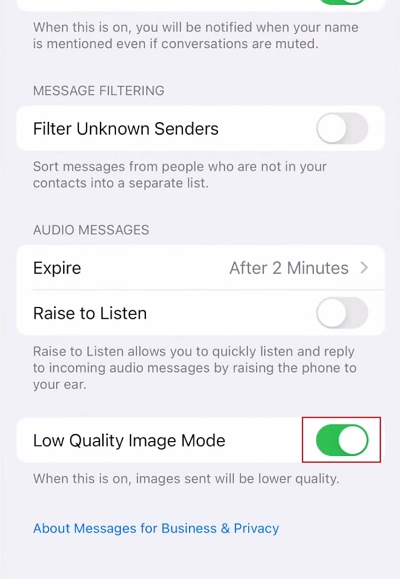
Keep in mind that these settings are only applicable for the iMessage app. If you are using third-party apps for messaging and mailing, they will not apply to these apps. You have to go to the individual app’s settings to manage attachments for those.
Conclusion:
Attachment sharing is one of the most useful tools of our modern communication. While this is useful, it ends up causing massive storage space loss in our iPhones, so you keep constantly running into app crashes and the annoying “storage space is low” message. Thankfully, there are many solutions that we can use to manage this and automate some of the file management processes for us. While iOS has some built-in features for this purpose, they are not always useful. So, the most intuitive one of these solutions is to use Eassiy Phone Transfer. As the name suggests, it is a complete solution for all your iPhone transfer needs, whether it be transferring large batches of data to another Mac device, iPads, Android phones or tablets, or backing up all data in your iPhone at the blink of an eye. Instead of having to download and install a bunch of different applications, you can use only one to perform all your iPhone data management needs.
Hot Articles

Macube Cleaner
Speed up and troubleshoot your Mac super easily with a Macube full-featured free trial!
Start Free Trial