While YouTube powers all the incredible features you seek in a professional streaming app, it isn’t without its dark sides, as you may experience system lag while using the app, and more. When such happens, you need to clear YouTube caches, so the app can function well and your mobile or computer system works at optimal level.
Clearing YouTube caches is pretty straightforward. No matter the device you use, this post will demonstrate the simple techniques you need to apply to manage YouTube caches. So read on!
Part 1. Everything You Need to Know About YouTube Cache
What Is YouTube Cache?
YouTube cache contains data such as images, videos, and others gathered while you are using the platform. This data occupies a great portion of your memory space.
What Does Clearing Cache Do?
Clearing caches does no harm than good to your device and the corresponding app itself. When you delete caches, your smartphone and computer system will run at an optimal level and also enhance storage. As for the corresponding app, you won't experience any lag or malfunctions.
Why Does YouTube Take So Much Cache?
Since YouTube cache is the track record of all the activities you’ve executed from the past to date, the corresponding data should take a significant portion of storage if not managed.
Part 2. How to Clear Cache On Computer
You can select and apply the guide that suits your computer operating system from the techniques introduced below to clear YouTube caches.
Method 1. How to Clear All Caches including YouTube Cache on Mac
Macube Cleaner is an excellent system cleaning utility well-designed with powerful features you need to clear caches on your Mac computer. It clears caches for various apps, from Safari to Spotify, iTunes, and lots more. You can also use it for YouTube caches. This Mac system cleaner powers an amazing algorithm that's smart enough to detect caches on your device. Macube Cleaner removes several megabytes to gigabytes of caches without compromising your system or other data on it. It doesn’t matter whether you are tech-literate or not, this software is very easy to install and operate. Besides caches, Macube Cleaner also gets rid of downloads, duplicate files, cookies, browsing history, and lots more.
Key Features
- With zero hassle and effort, you can easily clear YouTube caches on your Mac.
- Permanently delete sensitive files and browsing history to protect your privacy.
- Easily remove system junk and unnecessary personal files.
- Works with nearly all Mac models, from the older generation down to the latest.
Stepwise Guide to Clear YouTube Caches on Mac with Macube Cleaner
Get the most recent version of Macube Cleaner installed on your Mac, launch it and apply the procedure below to clear YouTube caches in no time:
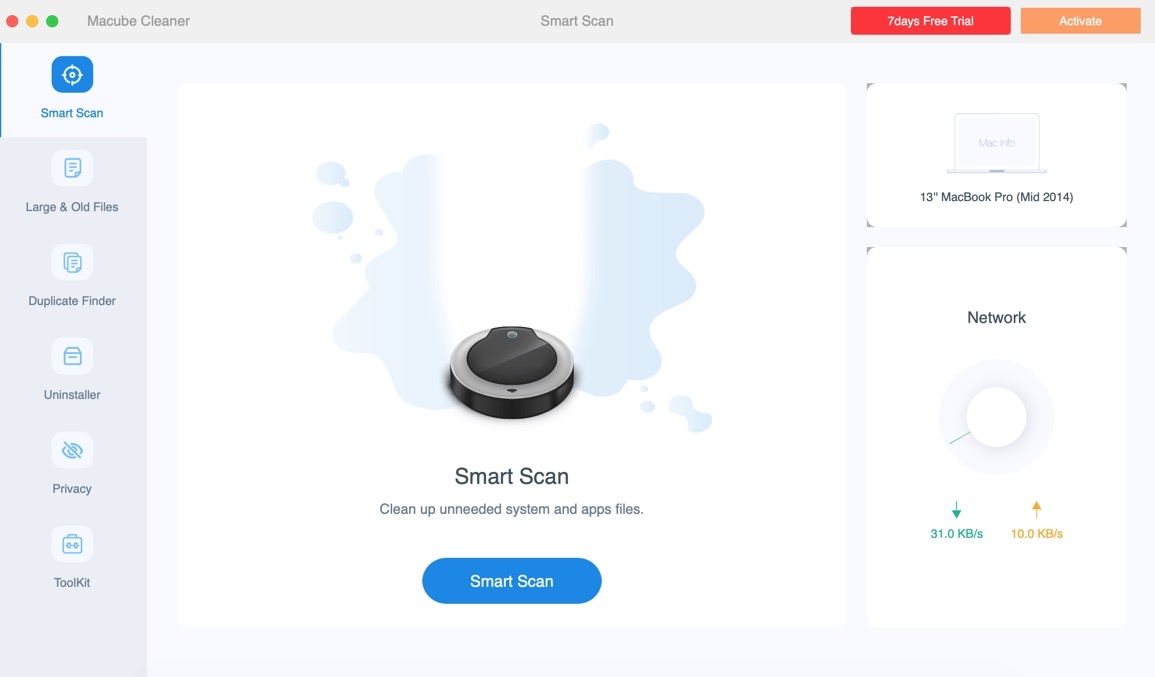
Step 1: When Macube Cleaner opens, tap the Smart Scan button at the bottom of the page displayed and wait patiently for the software to scrutinize all apps including YouTube for cache data.
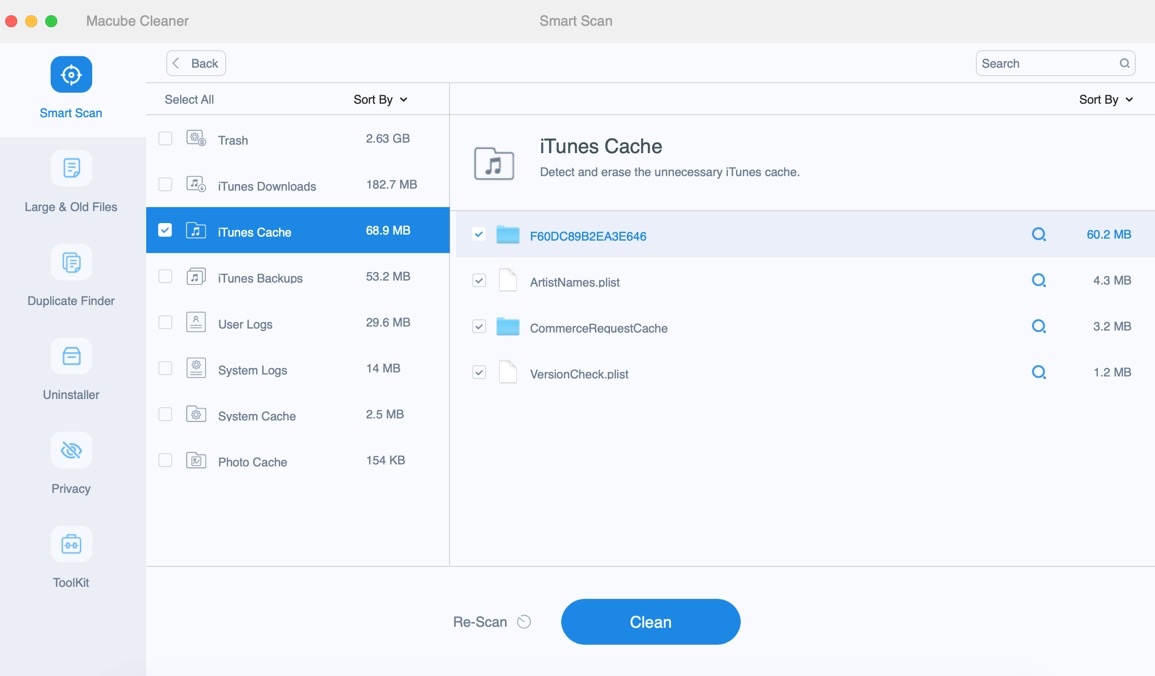
Step 2: Locate the Application Cache icon on the left sidebar, and check the corresponding box.
After that, all the cache data underneath YouTube will come up on the right hand panel.
Step 3: Select the Youtube cache you want to get rid of from your Mac computer, and hit the Clean tab. Macube will commence system cleaning immediately. Wait for it to finish, and a confirmation screen as below will pop up:
Method 2: How to Clear YouTube Cache in Safari Manually
Do you stream your favorite YouTube channel via Safari instead of the app? If so, you can also manage the cache data generated from the channel. You can do this directly from the Safari browser.
Here is the guide you need to follow to clear YouTube caches via Safari:
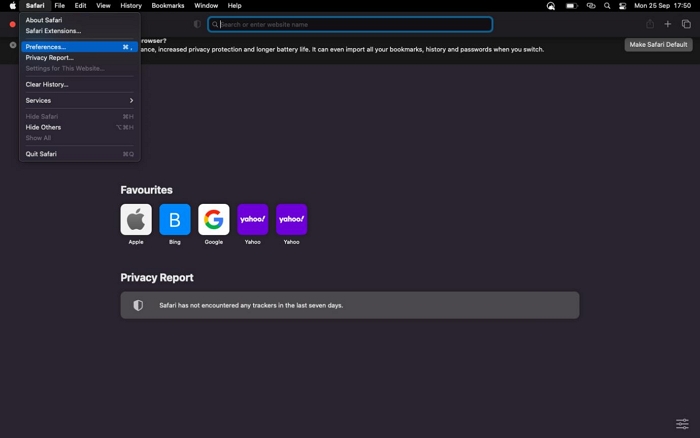
- Go to the Dock panel and click on the Safari tab to launch it.
- At the top menu, click on Safari > Preference. Better yet, you can use the Command + , buttons to get a similar result.
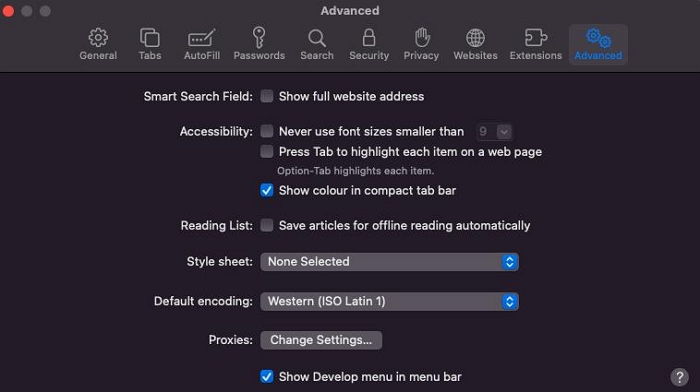
- On the Preference screen, click on the Advanced tab which is situated at the top of the page.
- Next, check the icon beside the Show Develop menu in menu bar.
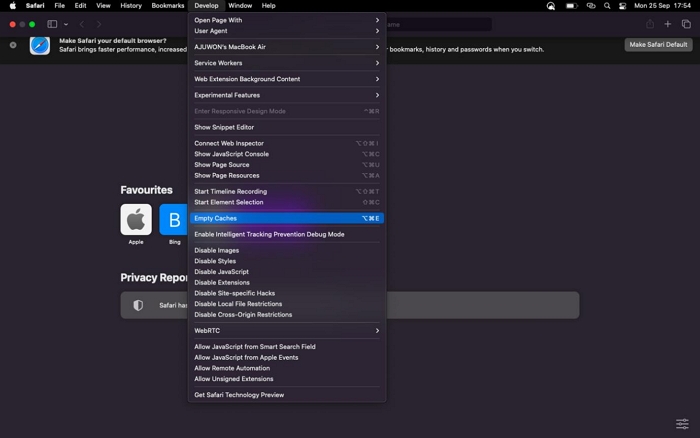
- Now go to the top menu again, click Develop, and a menu of options will fly out.
- Choose Empty Caches to proceed and end this guide.
Method 3. How to Clear YouTube Cache in Chrome on Windows
Folks with Windows computers who are looking for a simple way to manage YouTube caches in Chrome, here’s the quick guide you need to follow to do that:
- Ensure you have the most recent version of Chrome installed on your Windows computer, then launch it.
- Navigate your cursor to the upper right corner of the screen displayed and hit the three vertical dots to access the corresponding drop-down menu.
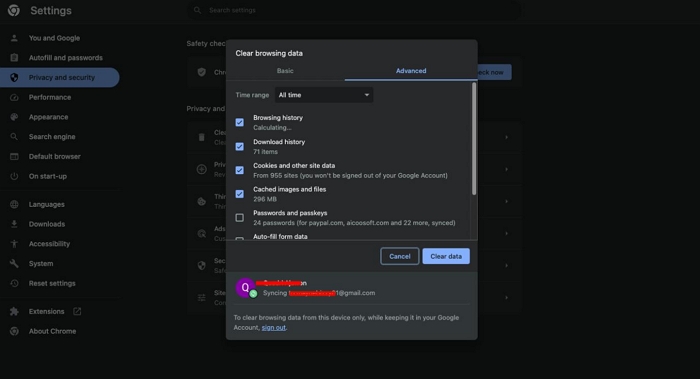
- Next, scroll towards the bottom of the screen and click on More Tools > Clear Browsing Data.
- At the top of the window where you have Time Range, choose All Time and check Cached images and files only.
- Once done, click the blue Clear Data button.
Part 3. How to Clear Cache On Mobile
Mobile phone users who also want to manage YouTube caches can apply any of the procedures below. Kindly ensure the procedure suits your mobile operating system
On Android Devices
Clearing caches on Android phones is one of the easiest tasks to execute. No data connection is needed and all the data you have on the device will remain intact. Follow these steps to manage YouTube caches on Android:
- Tap the Settings app icon (also known as gear button)
- Move to where you have Apps and click on the corresponding icon.
- Next, a screen with all the installed apps on your Android device will come up. Scroll through the apps displayed and click YouTube once you find the icon.
- Now, select Storage & cache, and hit the Clear cache button at the final stage.
On iOS Devices
Unlike Android mobile devices, Apple smartphones don’t offer a one-click solution to clear caches for any of the installed apps. Rather, you need to uninstall the corresponding app from the iOS device. This solution does not only remove the app from your storage, it also wipes the cache data stored.
Use these instructions to clear cache on your iOS device:
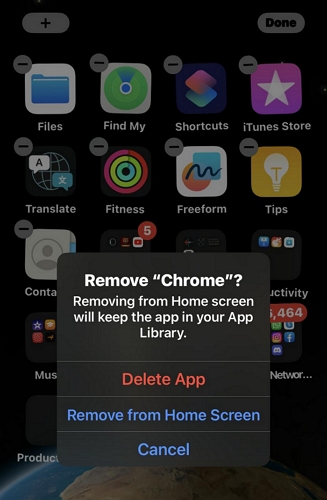
- Hold onto the YouTube app icon until your iPhone/iPad screen starts to wiggle.
- Tap on the "-" button beside the app, and a delete prompt will come up.
- Click Delete App and confirm your click when the next prompt comes up.
- Wait a while, then connect your iPhone/iPad to a data network and head to the Apple Store to reinstall the YouTube app.
FAQs
Q1. Why is YouTube not working after clearing caches?
YouTube isn't working after clearing caches on your mobile or computer system for several reasons. Some of them are listed below:
- Poor data network.
- Downtime on YouTube.
- Expired premium subscription.
- Incorrect date and time settings.
Q2. Is removing YouTube cache good?
Yes, it is!
Removing YouTube caches is very nice as it helps you clear unnecessary data from the platform which in turn optimizes the app itself and also enhances the operations of your system so it runs smoothly. Additionally, clearing YouTube cache increases your storage.
Conclusion
With the ultimate guide shared above, you can now deal with YouTube caches on any mobile device or computer system. All solutions preferred are simple to comprehend and work perfectly. However, Macube Cleaner is the best, as it removes caches, cookies, history and more from your macOS without compromising it.
Hot Articles

Macube Cleaner
Speed up and troubleshoot your Mac super easily with a Macube full-featured free trial!
Start Free Trial