Most of the formal communication today is done through emails, and if it turns sluggish or fails to load properly, your Mail app may face trouble in receiving new emails. As a result, all your work can come to a halt and take a toll on your Mac's performance too. Instead of stepping out to seek professional help, you must immediately clear Mac Mail cache and ensure your essential mail is not missed.
When cache files build up, they may result in problems like Mail app crashes, failure to load email and attachments, and the Mail app running slow. So it gets necessary to clear them as soon as possible.
This post discusses foolproof methods for Mac Mail clear cache manually and automatically and walks you through the deeper details of cache Mail to understand the concept before you jump on clearing the Mail cache files mindlessly. Let's look closely to see how you can reset the cache without trouble.
Part 1: All You Need to Know Before Clearing the Mac Mail Caches
Before you start clearing the Mac Mail cache, you must get yourself familiar with a few concepts of knowing Mail cache, its need, system performance on clearing the Mac Mail cache, and more. Let's have more profound insights into the topic.
What is Mail cache?
Mail cache generally keeps the information from your email stored on the hard drive (recently read emails), so you have a quicker loading or downloading time the next time when you need them.
Since cache helps your Mac locate emails instantly when you search through your mailbox, it acts as a memory storage to access your files rapidly, whether in your inbox or while loading already opened emails faster when you recall information.
When you regularly clear Mac Mail cache, you have enough disk space and ease of convenience to access important files. Emptying the Mail cache frequently ensures data protection, and additional storage space helps load essential files.
Why do you need to clear Mac Mail caches?
When your cache Mail is full, you may encounter issues receiving new emails, and viewing attachments can also be problematic. In addition, the situation worsens if you have multiple email accounts linked to the Apple Mail app, making it sluggish upon usage.
A cache sometimes reaches its memory limit, and a full cache can cause the Mail app to crash or not load correctly. You may miss essential information and experience delays in accessing your emails due to a slow app resulting in heavy losses, mainly if you use it to send/receive work emails.
And as we already said, if the Mail app fails to load correctly, it will keep crashing every now and then. So it gets essential to delete Mail cache Mac for smooth app performance. Cleaning the cache data of your Mac data usually frees up storage space by removing files you no longer need.
Will clearing the cache in Mac Mail delete my emails?
While clearing the cache work wonders for the app and your system, you may wonder if it will delete your stored emails. Stay relaxed, as cleaning up your Mac Mail app's cache does not delete contacts, emails, or other valuable information. Instead, when you clear Mail cache, it will force the application to redownload all your messages.
Can clearing the cache improve the performance of Mac Mail?
Every app on your Mac saves files to boost performance the next time you open it to work on it. And this is how caching works. However, these files can accumulate when functional, resulting in poor app performance.
So if your browser or Mail app is lagging in performance or you are seeking options to clear the junk and uninstall applications to clear the vital storage space, deleting the cache files can help significantly.
However, it would be best if you remembered that cache files help your Mac work faster, and when you clear Mac Mail cache data while the app is in use,it may slow things down.
Part 2: 2 Best Ways to Clear Mac Mail Cache Easily
When you have multiple options to try, why stick to one? Whether you are an expert or a newbie, you can try your hands on any method that's feasible for you and proceed with the steps to Mac clear Mail cache hassle-free. Let's look at these methods with their detailed steps one by one.
Method 1: How to Clear Mac Mail Cache Manually
The manual method works best when you need to save space and money to take things into your own hands and want to remove Mail cache Mac by yourself. Though it is a good idea for a quick workaround, make sure to have a backup in case things go wrong.
Fortunately, Mac has a built-in Finder tool to enable you to complete different functions. Generally, Finder opens when you start your Mac and stays open while using other apps. Using Finder, you can instantlyclear Mac Mail cache and boost your system's performance. This process also helps improve Mail app performance and results in better email loading than before.
But before you proceed with the following steps to clear Mail cache, ensure to close the Mail app fully, as leaving it open would not clear the Apple Mac cache completely because some processes will still be running. Let's see how to clear email cache with Finder on Mac.
Step 1: Close the Mail app by clicking the Option + Command and Esc keys together. Alternatively, click the Finder icon, open Applications, and select Apple Mail. Tap Quit.
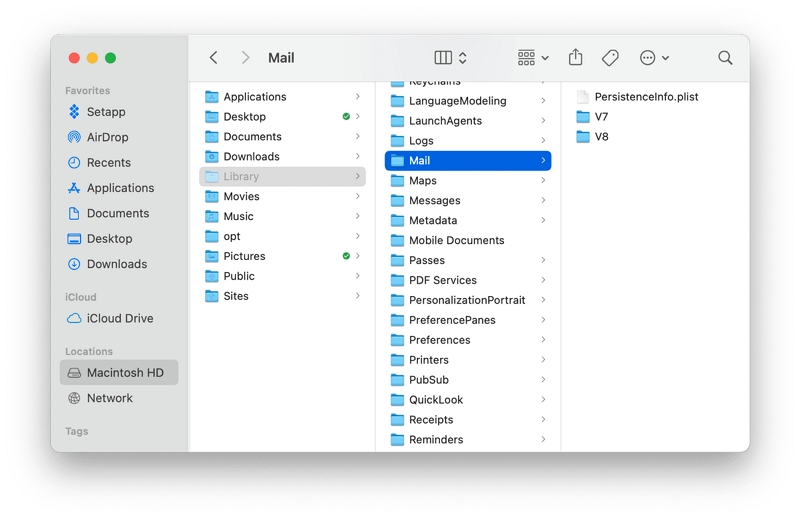
Step 2: Open the Finder window and tap Go in the top address bar. Click Go to folder.
Step 3: Type ~/Library/Mail/V8 and press the Return key on the keyboard.
Note: You may have a different number after V, such as V9/V10 (for current versions of Mac OS) or something else.

Step 4: Check through the folders you find here, right-click, and send items to the Trash/Bin by clicking Move to Trash/Bin.
Step 5: Empty the Trash/Bin to remove the deleted folder altogether and test the Mail app once finished.
This process helps delete all the emails your Mail app has saved in the cache. Now the next time you open the Mail app, it will redownload your messages from scratch and recreate the V folder.
Method 2: How to Completely Clear Mac Mail Cache Easily
Now this method is more convenient and serves the overall purpose of delivering satisfaction to beginners and professionals alike. Here we have used Macube Mac Cleaner to Mac Mail delete cache automatically. The program saves time and effort and reclaims disk space to optimize your Mac OS in a few clicks.
Macube Mac Cleaner is a robust software that focuses on the Mac platform to provide solutions to clean up your device and smoothly manage content. It is a one-stop platform that offers multiple functions. Primarily it is a junk cleaner tool that eliminates gigabytes of junk files and releases system storage with a click. The Cleaner program clears the system cache, user logs, system logs, and app cache hassle-free.
Besides offering solutions to clear Mac Mail mache, Macube MacCleaner lets you freely manage extensions like proxies, quick look, login items, third-party services, plugins, etc., clean old and large files, shreds files that are hard to delete, and protect your privacy by clearing cookies, download history, browser cache and more.
What Makes Mcube Mac Cleaner Need of the Hour for Mac Users?
Macube Mac Cleaner guarantees the best cleanup experience with a quick scan, powerful cleaning, and high security. Here's more to how the tool serves its customers.
- Quickly and securely deletes browsing data
- Finds similar images and removes duplicate files
- Manages and removes downloaded Main attachments
- Uninstalls useless applications
- Clears cookies, search and download history, etc., in a single click
- Preview scan results before deletion
- Empires Trash securely to free up space
- Supports common web browsers like Chrome, Safari, and Firefox
- Seamlessly works on Mac OS 10.10 or later
- Offers a 7-day free trial with full functionality
Let's find out how to clear Apple Mail cache with Macube Mac Cleaner in a few clicks.
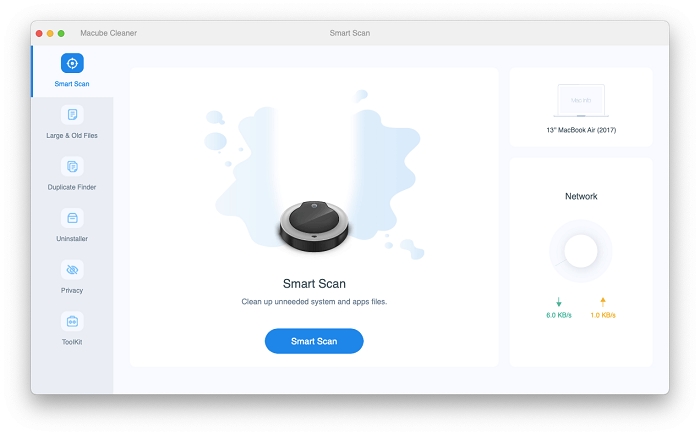
Step 1: Download Macube Mac Cleaner and run Smart Scan
Install and open Macube Mac Cleaner. Select the Smart Scan option on the home screen and click the Scan button to scan your whole Mac system and trace all the cache files.
Note: Macube Mac Cleaner will finish scanning in seconds and display all the detected files on the screen.

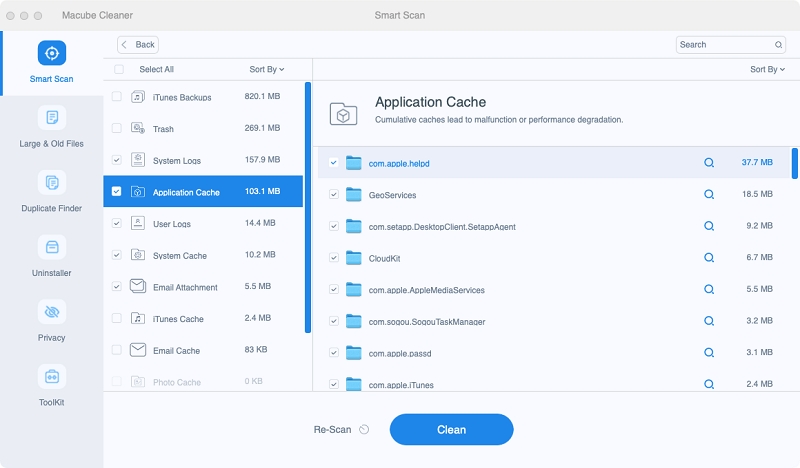
Step 2: Preview the scanned cache files
Preview and select the cache files you want to remove from your Mac according to your needs and requirements.

Step 3: Clear Mac Mail cache instantly
Once done, tap the blue-colored Clean button, and the program will automatically remove all the cache files.
After the cleaning process finishes, you will see how much storage space is cleaned to store other necessary data and files.
Part 3: The Things You Must Do and Know After Clearing the Mac Mail Caches
Now you know enough about cache mail and processes to clear them manually or automatically. Still, if any of your queries still need to be solved, these tips and frequently asked questions will help you solve that as well to keep your Mail app optimized and your Mac working smoothly.
#1. How often should I clear my Mac Mail cache?
Maintaining your system for optimal performance is a good hygiene practice. You can clear Mac Mail cache whenever your system runs low or the Mail app fails to load correctly. Or, as a routine, set a daily/weekly/fortnightly/monthly schedule to delete the Mail cache before it builds up and impacts your productivity.
#2. How to automate the clearing of the Mac Mail cache?
Mac Mail app caches every email offline to create cache data on your system. Additionally, it saves mail attachments such as PDFs, images, videos, ZIP files, etc., consuming high disk space. Macube Mac Cleaner is a smart way to find and delete Mail cache Mac automatically to free up storage space. We have shared the detailed process of the program's usage above to help you quickly clear Apple Mail cache.
#3. Reduce space usage of your Mail apps
The Mail app can take considerable disk space for many reasons, like attachments, archived emails, etc. Generally, attachments consume the largest space. So if you no longer require them, ensure to delete them. You can use Macube Mac Cleaner to remove large and old attachments.
Secondly, direct Mail to not automatically download attachments. To do so,
- Open the Apple Mail app and select the Mail Menu.
- Click Preferences and select Accounts.
- Tap the dropdown menu beside Download Attachments and click None.
- Or, select which account settings you want to change and tap Advanced, then uncheck the Automatically download all attachments.
This way, mail attachments won't download automatically but'll be stored online until needed.
Thirdly, you can ditch the Mail app and use something else like Gmail or a third-party email client that stores fewer emails offline and limits your cache's size to a manageable size. When you disable the email account, the emails will not appear in the Mail app, but they'll remain stored in the offline cache, and you can delete the folder to free up disk space.
The Bottom Line
While most people use email on their browsers for significant convenience and accessibility, you may prefer Apple's Mail app to read and send emails. However, this way, the Mail app captures multiple files in its cache and takes up storage space resulting in poor app and system performance. Anyway, you must follow our detailed methods to clear Mac Mail cache manually or automatically and create more space to improve the working of your app and overall system. You can try Macube Mac Cleaner today to boost your Mac's overall performance.

Macube Cleaner
Speed up and troubleshoot your Mac super easily with a Macube full-featured free trial!
Start Free Trial