We've all been there: that situation where your Mac suddenly starts acting up, and you need to troubleshoot issues, diagnose problems, or perform maintenance tasks. This is where Safe Mode comes to your rescue.
Yes, whether you're dealing with a sluggish system, persistent software glitches, or suspecting a misbehaving application, knowing how to quickly boot your Mac in Safe Mode can be a lifesaver.
In this post, we've covered all you need to know about Mac Safe Mode, from what it is to its functions, the reasons you might need to turn it on, and how to turn it on. Keep reading to find out more!
Part 1: What Is Safe Mode?

Although it's usually confused for “Recovery Mode”, Safe Mode, also known as Safe Boot, is a diagnostic mode that starts up your Mac with a minimal set of software and drivers. It is designed to troubleshoot and isolate software-related issues that may be causing problems during startup or regular operation. When you boot your Mac in Safe Mode, it performs essential checks, such as verifying the startup disk and loading necessary kernel extensions, while preventing certain processes and programs from running automatically.
Functions of Mac Safe Mode
Mac Safe Mode serves several important functions, including:
- Verification and Repair Of System Issues: Safe Mode verifies and repairs issues related to the startup disk and directory problems. It ensures that your Mac's file system is healthy.
- Software Troubleshooting: By disabling non-essential processes and login items, Safe Mode helps identify if a specific application or software is causing the problem.
- Font and Extension Management: Safe Mode disables user-installed fonts and unnecessary system extensions, making it easier to identify font or extension-related issues.
Part 2: Reasons You Might Need To Turn On Safe Mode On Mac
There are certain situations where booting your Mac in Safe Mode can be beneficial. Some of them include:
- Incomplete Startup: If your Mac fails to complete the booting process or gets stuck at a specific point, Safe Mode can help identify and resolve the underlying issue.
- Application Problems: If a specific application is causing stability issues or crashes on your Mac, Safe Mode can help isolate the problem by preventing third-party apps from launching.
- Sluggish Performance: If your Mac is running slower than usual or experiencing lag, Safe Mode can help identify if third-party software or login items are responsible for the performance issues.
- Directory Problems: Safe Mode can help repair problems with the directory structure of your Mac's startup disk, ensuring optimal performance and stability.
Part 3: How To Turn On/Off Safe Mode on Mac
Option 1: Turn On Safe Mode
The process of entering Safe Mode varies slightly depending on whether you have an Intel-based Mac or an Apple Silicon Mac. Let's explore the steps for both:
Method 1: For Intel-Based Macs:
Step 1: Shut Down Your Mac
If your Mac is on, shut it down properly by clicking the “Apple Menu” at the top-left corner and selecting “Shut Down” from the drop-down menu.
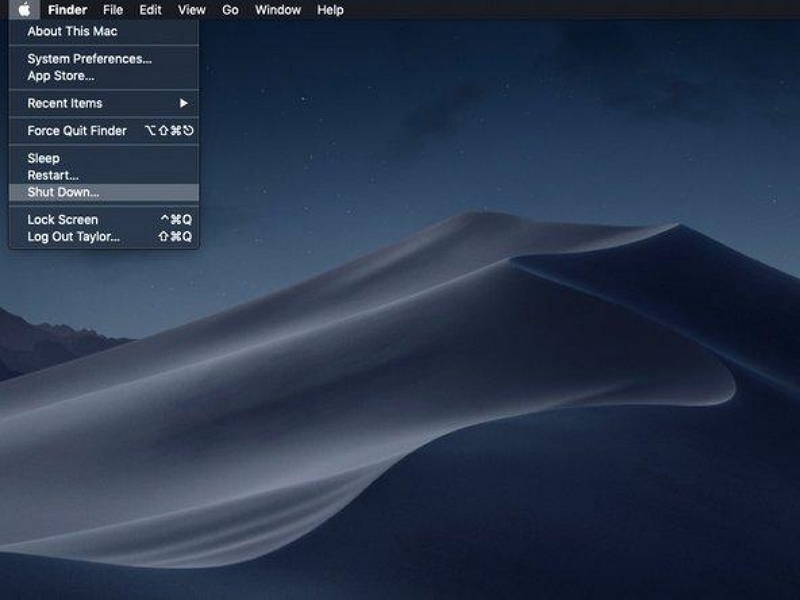
- However, if your unresponsive, press and hold the power button for 15 seconds to force a shutdown.
Step 2: Start Mac in Safe Mode
Press the power button to turn on your Mac, and immediately press and hold the Shift key. You should see an “Apple Logo” and a “Progress bar” just like the one in the images below appear on your screen.

Step 3: Log in
Release the key when you see the login screen. Then, enter your “username” and “password” to log into your Mac. If you have enabled FileVault, you may need to log in twice - once to unlock your disk and again for your user account.

Method 2: For Apple Silicon Macs:
The procedure to put Apple Silicon Macs into safe mode is pretty similar to Intel-based Macs. However, there's a catch. Here is how:
Step 1: Shut Down
Just like we did with Intel-Based Macs, you need to turn off your Apple Silicon Mac or just press and hold the “power button” until you see the "Loading startup options" text on the screen.
![]()
Step 2: Choose Startup Disk
In the startup window, you'll see a list of active startup disk connected to your Max. Select the disk you want to boot from.
![]()
Step 3: Enter Safe Mode
Press and hold the “Shift key”, and the "Continue" button under your startup disk should change to "Continue in Safe Mode." Click it to enter Safe Boot.
Once you complete that, you've successfully entered Safe Mode on your Mac, and it will start up with minimal processes and restrictions.
Option 2: Turn Off Safe Mode
If you have booted your Mac into safe mode to resolve macOS issues and are unsure how to exit it, fortunately, the process is not as complicated as it may seem.
Step 1: Click on the “Apple Menu” and select “Shut Down”.
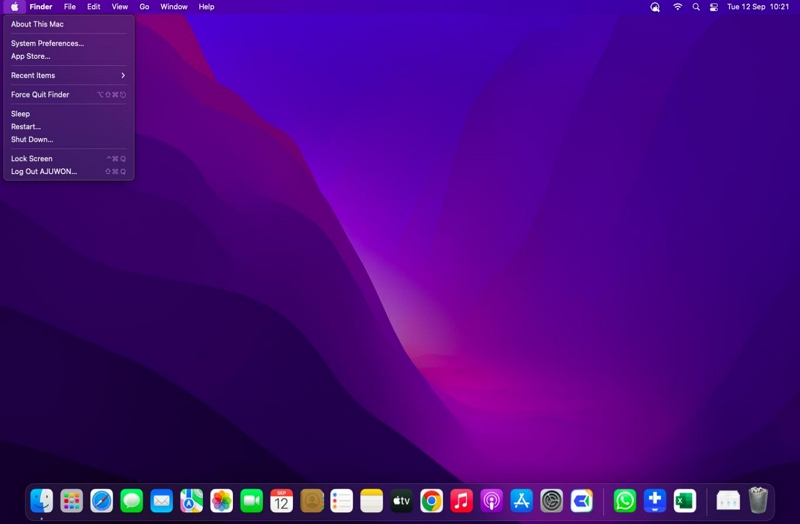
Step 2: After that, press the “Power button” to turn on your system.The Safe boot should now be turned off on your Mac.
Part 4: How To Confirm Whether Safe Mode Is Turned On
There are several ways to confirm if your Mac is in Safe Mode:
- Menu Bar Reads “Safe Boot”: Look for the words "Safe Boot" in red in the menu bar. This indicates that your Mac is currently in Safe Mode.
- Slower Performance: Safe Mode typically results in slower overall performance. This is because certain features, such as accelerated graphics, are disabled in Safe Mode.
- System Information reads “Boot Mode”: Open the System Information window and navigate to the "Boot Mode" section. If it displays "Safe," your Mac is running in Safe Mode. Otherwise, it will show "Normal."
Bonus: What If Safe Mode Does Not Fix Mac Issue?
If you've followed the steps to enter Safe Mode, but the problem persists, you may need advanced software like Macube Cleaner to optimize and repair your Mac.
Macube Cleaner is a powerful software designed to enhance the performance and stability of your Mac. With its comprehensive set of features, it can help you optimize your system, clean up junk files, and protect your privacy.
Key Features:
- Macube Cleaner helps protect your privacy by securely deleting sensitive data, including cookies, auto-fill history, downloads, and more.
- Boasts the best smart algorithm to clean up junk like app caches, iMessage data, email attachments, iTunes, photos, videos, etc.
- Remove duplicate files from Mac storage safely and securely.
- Advanced large & old file finder to detect and clear huge and old files taking up Mac storage and compromising performance.
- Built-in toolkit that contains more helpful tools like similar images finder, extension manager, and files shredder.
If you want to optimize your Mac performance using Macube Cleaner, follow the steps outlined below:
Step 1: Launch the Macube Cleaner, scroll to the left pane, and click on the “Smart Scan” feature. Then, click on the “Smart Scan” button to initiate a deep scan.

Step 2. Macube Cleaner app will deeply scan your Mac for junk files, including message history, email attachments, cache files, iTunes, etc., on your Mac. Then, display them in various categories.
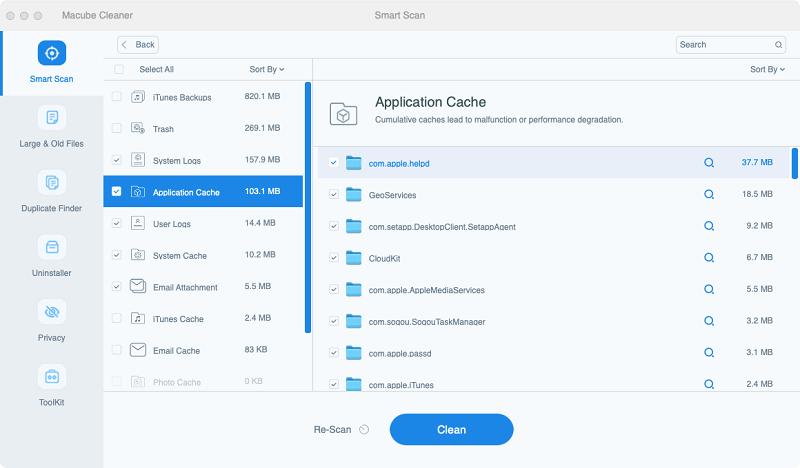
Step 3. Preview the files by clicking on the “Magnifying glass” next to them. Then, select the file that needs to be eliminated and click on “Clean” to remove them from your Mac completely. This usually takes a few minutes to complete.

FAQs:
What can I do if Mac Safe Mode is not working?
If your Mac safe mode is not working, there are different fixes you can use to resolve the issue. We’ve discussed three of them below:
Option 1: Hold the Option key while your system boots:
This can help you access different startup options and potentially resolve issues with Safe Mode. Here is how:
Step 1: Shut down your Mac.
Step 2: Hold down the “Option” key and press the “Power” button.
Step 3: A list of different drives on your Mac should appear on your screen. Select your Mac’s “Startup Drive” and click the “Enter” key to finish. After that, try starting your system in Safe Mode.
Option 2: Check your security settings:
Another thing you can do to resolve Mac safe mode not working issue is to ensure that your Mac's security settings are not preventing the booting process into Safe Mode. Perhaps you've accidentally enabled Firmware password or FineVault. Try turning it off.
Step 1: Simultaneously press Command + R to restart your system.

Step 2: Type the “Firmware password” when prompted.
Step 3: Choose a preferred language and click on “Utility” option. Then, go to “Startup Security Utility”.
Step 4: Now, click on “Turn off Firmware Password” and enter the Firmware Password again.
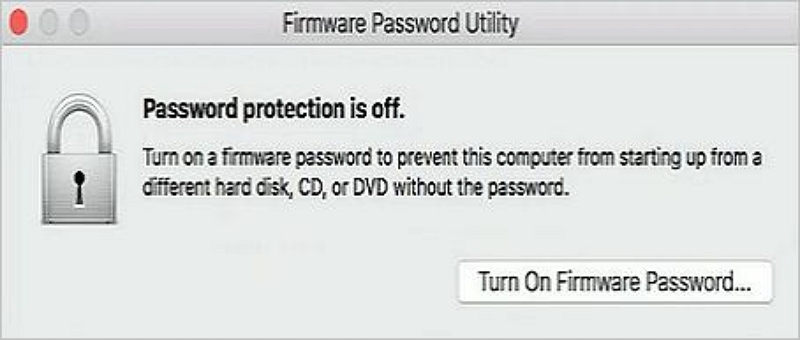
- You also need to disable FineVault. You can achieve that by doing the following:
- Go to “System Preference” > “Security & Privacy” > FineVault. Then, click on the “Lock icon” at the bottom left corner and type your authentication credentials to unlock system preference.
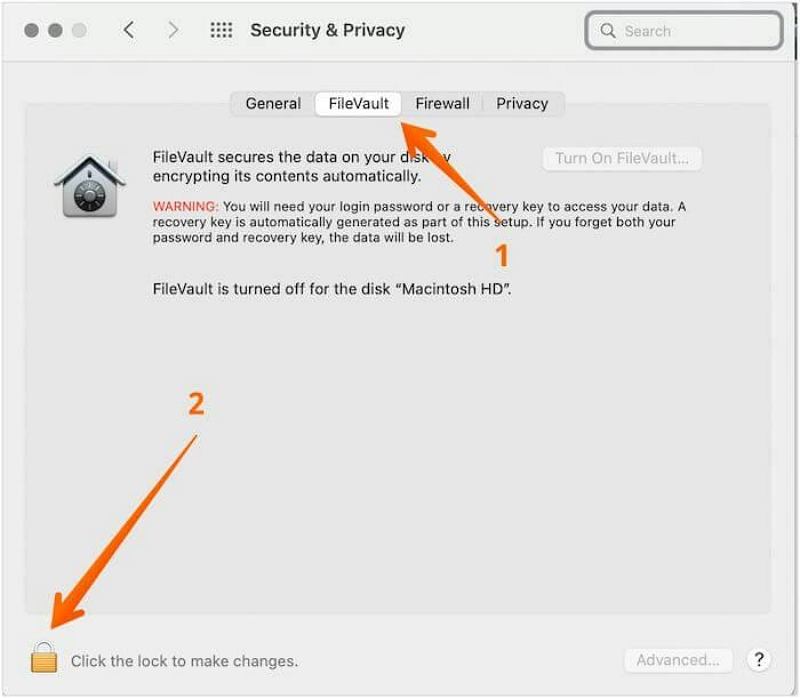
- After that, click on “Turn off FineVault” and press the “Lock icon” again to save the changes.
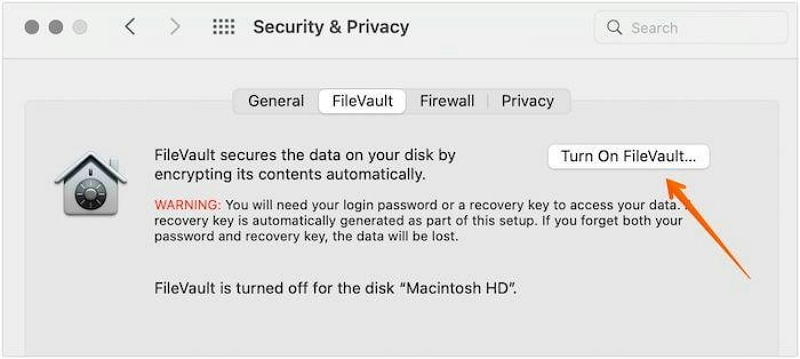
Once you complete the above, try restarting your Mac in safe mode.
Option 3: Reset the SMC
If the above methods does not work, resetting the System Management Controller (SMC) can help resolve the issues. However, this only works for Mac that have Apple T2, M2, or M1 chip. Here is how:
Step 1: Shut down your Mac.
Step 2: Simultaneously press “Option key” + “Control key” + “Shift key” on your keyboard and hold them for about 10 seconds.
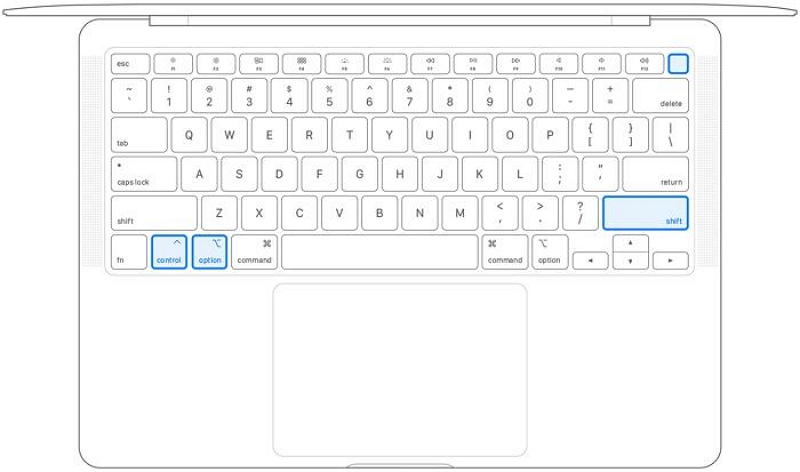
Step 3: Afterward, press the power button and keep holding it until your system turns off. Then, restart your Mac in safe mode.
Conclusion
Mac Safe Mode is an invaluable tool for troubleshooting and resolving startup issues on your Mac. By following the steps outlined in this guide, you can easily enter Safe Mode, diagnose software-related problems, and optimize your Mac's performance.
However, if Safe Mode doesn't fix your issue, consider using advanced software like Macube Cleaner to clean up your Mac and optimize its performance. It boasts the best tools to help you operate seamlessly.

Macube Cleaner
Speed up and troubleshoot your Mac super easily with a Macube full-featured free trial!
Start Free Trial